How to use iDVD to burn a DVD? This iDVD tutorial can help you to understand iDVD better.
 By Abby Poole to iDVD, Mac Tips|Last updated on Mar 28, 2019
This iDVD tutorial explains how to use iDVD to burn a disc and covers all the basics of the Mac built-in app, including its user interface preview, guides to add a movie/slideshow/soundtrack, edit button, copy DVD to DVD, project from iMovie, iPhoto and iTunes library to DVD. Now, follow the step-by-step iDVD user guide to burn a DVD on MacBook Pro/Air/iMac to create backup, play on various TVs, computers, share with others.
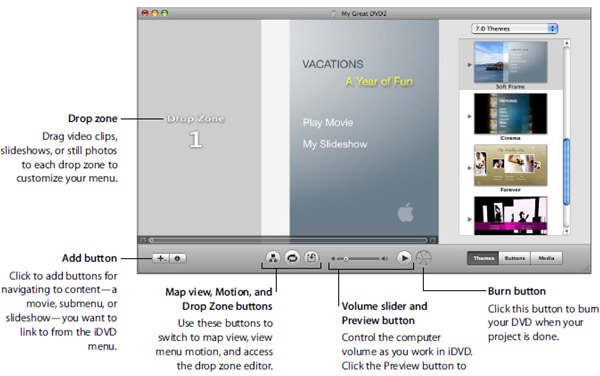
Before you go through the iDVD tutorial, look at the user interface and learn some basic menus.
• Drop Zone: Drag files like videos, clips, movies, slideshow, photos to edit.
• Add button: click the button to add content.
• Burn button: click the Burn Button to burn DVD on Mac when editing is finished.
• Media: Click this button to access iTunes media files and iPhoto libraries.
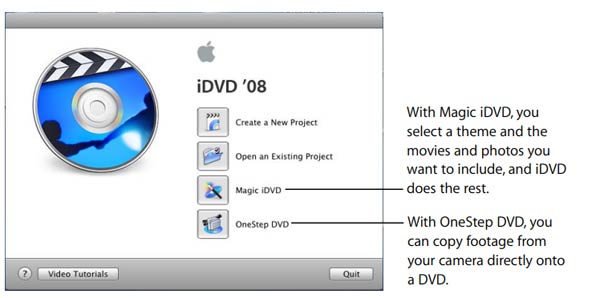
Click the iDVD application icon in the Dock, and Click the "Create a New Project" button in the opening dialog, shown below. Or you can also choose Magic iDVD and select a theme, movies, photos etc. Meanwhile, choosing OneStep DVD will copy clips footages from camera to a DVD. Check iDVD supported formats if necessary.
Go to iDVD > Preferences > Project to set the encoding quality, DVD type and video mode. It will set the video mode for your region. NTSC is used in North America, South America, Japan, South Korea, and PAL is mostly used in Australia, Western Europe, and others. Check out how to convert PAL DVD for burning. Best Performance mode will encode quickly with nice quality. High Quality option is for larger video encoding and compress data to a disc with good video quality. It takes longer to burn onto your disc. Professional Quality is the option for users who require best quality possible. It is the slowest mode, so we don't recommend this mode on the iDVD guide for users who don't want to spend too much time.

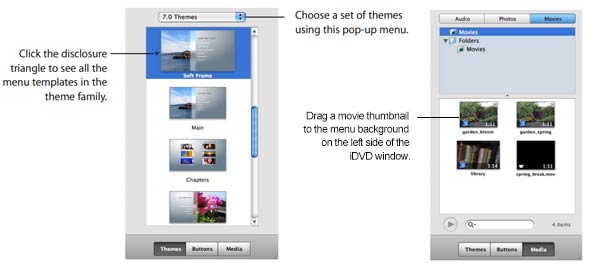
Click on the Themes button at the bottom and choose a theme for your DVD menu, as shown below. You can save the custom theme for future uses.
Click the Media button at the bottom of the window or the Movies button at the top right pane to add movie or clips, photos, folders to the project. You can add more than one movie title at the same time. Or you can directly drag a movie thumbnail to the drag zone on the left of the iDVD window.
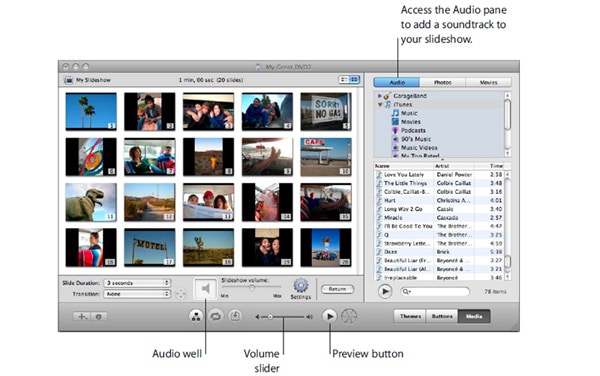
Click Add button at the bottom left corner of the Window and choose Add Sideshow to add slideshow. You can also use this Mac DVD burner to make slideshow. iDVD supports to load more than one pictures and even a whole photo albums from iPhoto album or hard disk on your computer. You can arrange these pictures, delete them, add soundtracks and transitions to your images.
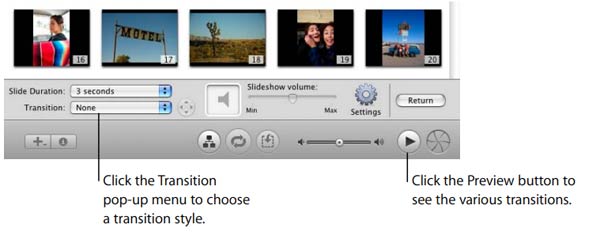
Click Transition button to add transition between images. You can click the Preview button to see which transition is your favorite.
Click the Audio button at the top right of the Media pane, select a song from your iTunes library, and drag it to the Audio well.
Click Project, Add Text, drag the text to the place below the title. Press Command + (x) to open the Text Info iwndow and edit text color etc.
Choose Edit on the main menu > Select All buttons and edit button text, shape, image and add transitions to buttons.
After the editing is finished, you can burn these projects to a DVD disc for backup or playing on TV, computer with disc drive. Preview your projects to make sure they are ready before you continue to learn how to use iDVD to burn a DVD. Then choose a media type to burn a disc. The recommended type is DVD-R that is playable on most DVD players for Mac.
Click the Burn button, insert a blank disc into your computer's SuperDrive for Mac or Mac external hard drive - if your hard drive is new, learn how to easily format hard drive on Mac before using. And it will start to burn projects from iMovie, iTunes library, hard disk etc. to DVD. The DVD burning speed depends on the your computer performance, the video size. If you want to burn a DVD to DVD using iDVD, scroll down to study the iDVD tutorial on how to import a DVD for latering burning into a blank DVD disc.
You can't directly import a DVD to iDVD, you need a third party DVD ripper software. MacX DVD Ripper Pro, one of the most popular DVD copy programs, is a good option. It can copy any type of DVDs, including new DVD releases from Disney, Sony, Paramount etc, 99-title DVDs, unplayable/damaged DVD, exercise/workout DVDs and more. You can use the software to 1:1 copy DVD to ISO image, Video_TS folder, MKV full title for burning to DVD. Thanks to High Quality Engine, HT tech, Hardware Accelerator, and Multi-core (up to 8 cores) processing, the program can rip DVD to a format supported by iDVD with best possible quality and at least 5x faster speed than Handbrake and others. Follow the guide below.


Step 1: Free download the DVD to iDVD ripper software for Mac (macOS High Sierra or earlier), and launch it. Insert your DVD into Disc drive, click "DVD Disc" button on the top left of the window and select the DVD to load.
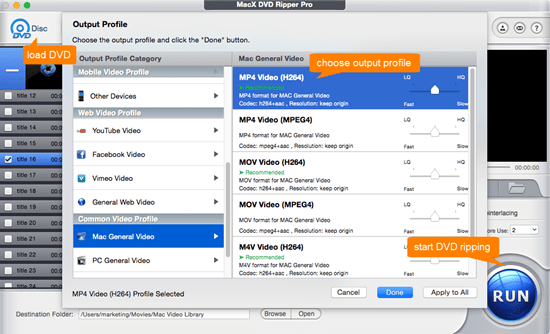
Step 2: A window will pop up. Click DVD Backup under DVD Backup Profile on the left pane, you can select "Main Title Content Copy", "Full Title Copy", "Clone DVD to ISO image", or "Backup full title to MKV" mode, then click "Done" to save the settings.
Step 3: Click "RUN" button at the bottom to start to copy DVD to computer. Then import the ripped DVD to iDVD and follow the above iDVD tutorial to burn into DVD disc. Note that you can only copy commercial for personal use. Read more iDVD manuals from Apple.

Digiarty Software, Inc. (MacXDVD) is a leader in delivering stable multimedia software applications for worldwide users since its establishment in 2006.
 Fast Copy and Import DVDs to iDVD with Original Quality