
Though the camera on mobile phone/tablet becomes better and better, DSLR camera is still your primary choice when you go out for a travel shoot. Similar to iPhone X/8/Plus, the latest DSLR cameras also enable you to capture impressive moments in 4K Ultra HD 2160p resolution, a big step forward from 1080p Full HD. Yet, every coin has two sides. The unfavorable aspect is that the output 4K video size is too large to use.
See, a 1-min 4K H264 video at 30FPS captured by iPhone X is 350MB in size. The same video captured by Sony a99II 42.4MP Digital SLR camera goes to 422MB and Canon EOS 5D Mark IV produces output file size with 552MB per minute for 4K 30FPS video at H264 codec. After you shoot video footages esp. 4K UHD videos, the first post-processing task oughts to compress and resize DSLR video. Or you will encounter waterloo when you upload DSLR 4K/1080p video to YouTube/Facebook or Email to your friends. To make DSLR video size smaller, you need a top video compressor to reduce DSLR video without affecting quality.
Which Compressor Can Resize DSLR Video (70% Size Off) with Best Quality
The highly recommended video compressor for DSLR is Macxvideo AI, which stands head and shoulders above other rivals because it can:
- Shrink DSLR camera video by compressing 4K 2160p to 1080p, lowering bit rate about 20% - 40% (no visually quality loss) and adjust DSLR video frame rate from 60FPS to 30FPS. The parameter adjustment can downsize DSLR video up to 70% size off with 2% quality loss (High Quality Engine supported).
- Convert DSLR video from H264/AVC to HEVC high efficiency video coding with at least 50% size off while keeping the same level or even better quality.
- Further reduce DSLR 4K/1080p video size via video editing features: enable "Trim" feature to freely set up the start/end time of video to shorten video duration; activate "Crop" feature to adjust image height & width and delete unnecessary file data. This will slim down DSLR video with 10% - 90% size off.
How to Compress DSLR Video with Highest Possible Quality
Free download DSLR video compressor program on computer:
Free download Mac version (macOS 10.5 or above)
Free download Windows version (Windows 10/8.1/7/XP)
Step 1: Reduce DSLR Video via Codec Conversion (about 50% compression ratio)
Launch this Ultra HD video compressor and click the button with a + icon to import DSLR video. Or simply drag and drop the DSLR video file into the software.
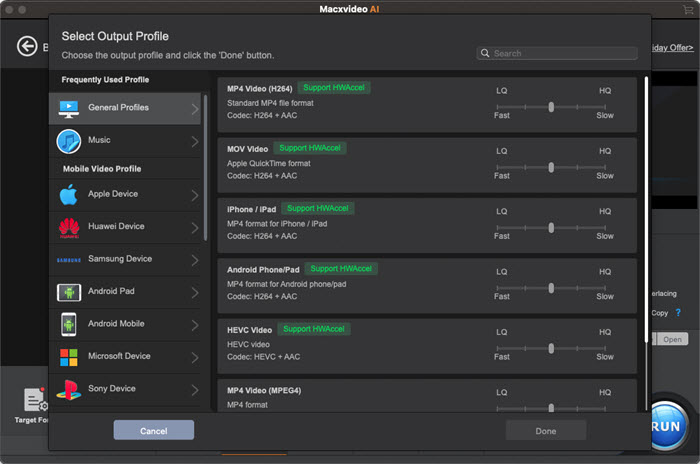
Opt for "MP4 Video (HEVC)" from "Mac General Video" profile as output video codec if the destination device (like iPhone X/8/7/6s/Plus, Galaxy Note 8, Google Pixel, etc.) supports HEVC codec, the websites you wanna upload DSLR recorded video to is compatible with HEVC or you just wanna backup DSLR video on your hard drive. Alternatively, choose "MP4 Video (H264)" from "General Profile" as output format if HEVC is incompatible with your device/platform.
On top of HEVC (H265) codec, WMV, 3GP and FLV formats also have better compression ability than H264/MPEG-4 AVC, which can dramatically compress DSLR video at 65% compression ratio and of course comes at the expense of certain quality loss. They are suitable for you to upload DSLR to YouTube/Facebook, etc.
Note: pay attention to the lower right corner of the home screen, where you can tick "Use High Quality Engine" and "Deinterlacing" options to ensure the output quality as high as possible, with 98% quality kept for general video processing (e.g., MPEG-2 to H264) and 100% quality reserved for "Auto Copy" mode (e.g., copy H264 video from MKV to MP4 container format).
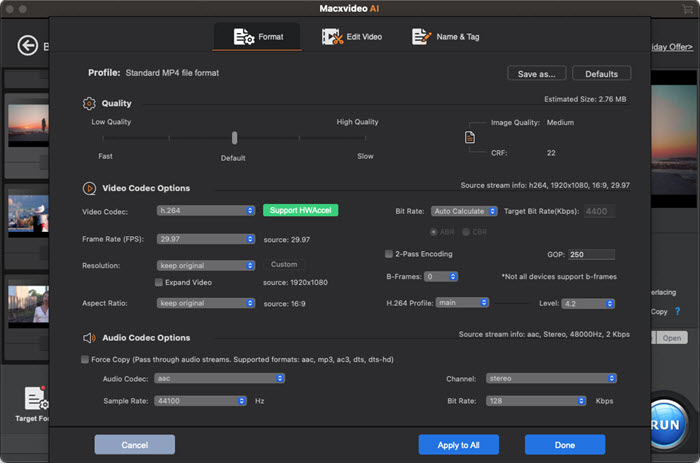
Step 2: Adjust DSLR Video Parameter Settings (about 30% compression ratio)
Tap parameter settings icon ![]() to adjust DSLR 4K UHD/1080p Full HD video resolution, bit rate, frame rate, aspect ratio, etc. Generally, to play DSLR video on your mobile phone or tablet, you can freely change DSLR parameters according to your device specifications. As for changing DSLR video parameters to upload on SNS, you need to refer to the specific website requirements on video uploading. Here we collect the basic requirements of most popular SNS for your reference.
to adjust DSLR 4K UHD/1080p Full HD video resolution, bit rate, frame rate, aspect ratio, etc. Generally, to play DSLR video on your mobile phone or tablet, you can freely change DSLR parameters according to your device specifications. As for changing DSLR video parameters to upload on SNS, you need to refer to the specific website requirements on video uploading. Here we collect the basic requirements of most popular SNS for your reference.
- 1. YouTube: recommended format: MP4 (H264); frame rate: 24, 25, 30, 48, 50, 60FPS; Bit rate: 35-45 Mbps (4K)/8 Mbps (1080p); resolution: up to 8K.
- 2. Facebook: recommended format: MP4 (H264); frame rate: 24, 30FPS; resolution: up to 1080p.
- 3. Instagram: recommended format: MP4 (H264); frame rate: 29.96, 30FPS; Bit rate: 5,500 kbps (1080p); resolution: up to 1080p.
- 4. Vimeo: recommended format: MP4 (H264); frame rate: 23.98, 24, 25, 30, 50, 59.94, 60FPS; Bit rate: 2 – 5Mbps (SD), 5 – 10Mbps (720p), 10 – 20Mbps (1080p), 20 – 30Mbps (2K), 30 – 60Mbps (4K), 50 - 80Mbps (8K); resolution: up to 8K.
For some video sharing sites like Facebook and Instagram, you're required to downscale 4K to 1080p and make sure the frame rate not more than 30FPS. In respect to YouTube and Vimeo, there are larger space for you to freely compress video resolution, change frame rate, bit rate, aspect ratio and more.
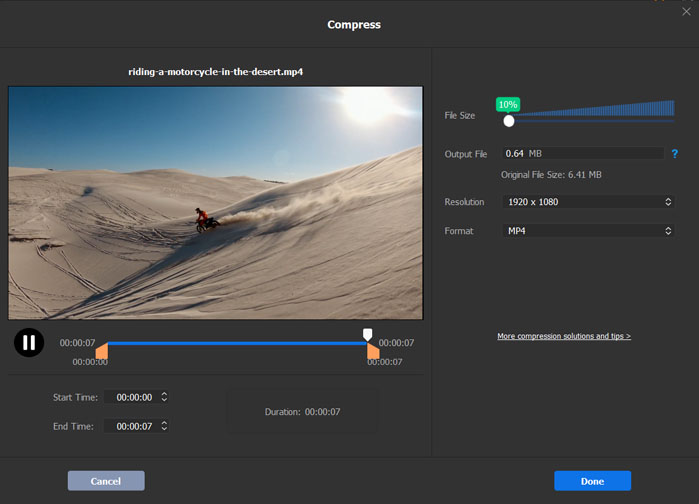
Step 3: Resize DSLR via Video Editing
Most of time, what we wanna upload or share is just the highlights of the video, not every single video clip in the video. To make DSLR video upload faster, another effective solution is to use video editing features like Trim and Crop, which can be accessible via scissor-shaped icon  . After you enter the editing interface, follow the below tips to further reduce DSLR files.
• Press Trim and tick "Enable Trimming" box. Afterwards, directly drag the slide bar to set up the Start Time and End Time so as to cut off the unnecessary clips from your video to shorten your video length as well as shrink DSLR file size.
• Click Crop & Expand and enable Crop box. Then the marquee will pop up for you to freely adjust the video image size. Just choose your desired video height and width and then tap "Apply to All" button to save your changes.
Step 4: Start Compressing DSLR Video
When everything is done, tap "RUN" and this Mac video compressor sets about converting and reducing DSLR video. The actual DSLR video compression time is jointly decided by DSLR video length, DSLR video resolution, output codec you choose, computer hardware configurations and the running status of your PC.
Reduce and Resize DSLR from 10GB to 3GB No Quality Loss
Macxvideo AI is a professional video compressor to help you resize and shrink DSLR size with good balance among output quality, file size and speed: No.1 fast hardware accelerated speed to compress and reduce DSLR video with 98% quality kept (High Quality Engine). Take full use of MacX' video codec conversion, parameter adjustment (4K to 1080p/720p) and video editing (Trim/Crop) features and you can downsize DSLR video with 70% size off.


Candice's particularly skilled in writing and sharing video-related contents. Her guides cover from deep-seated video/audio parameters, to media entertainment on different platforms. She also enjoys shooting and processing videos by herself for a more reliable basis of informative info with her articles, which are never at the expense of eliminating an entertaining read.


