1. Special Effects
Free download this video enhancement software on your macOS computer first, which is compatible with Mac OS X 10.7 or higher (macOS Big Sur). Afterwards, fire it up. No any 3rd party app, plug-in or add-on needed. 100% safe and clean to your Mac desktop.
Step 1: Hit "Video" icon at the main screen and you'll be directed to the video processing window. You can see there are more options for you: DVD, Downloader, Recorder. You can activate them to help you rip/backup DVD movies, download online videos (1000+ sites supported) and record Mac/iPhone screen.
Step 2: Tap "Video" or "Video Folder" to import your video files. Video Folder is specially designed to batch process videos at one stroke.
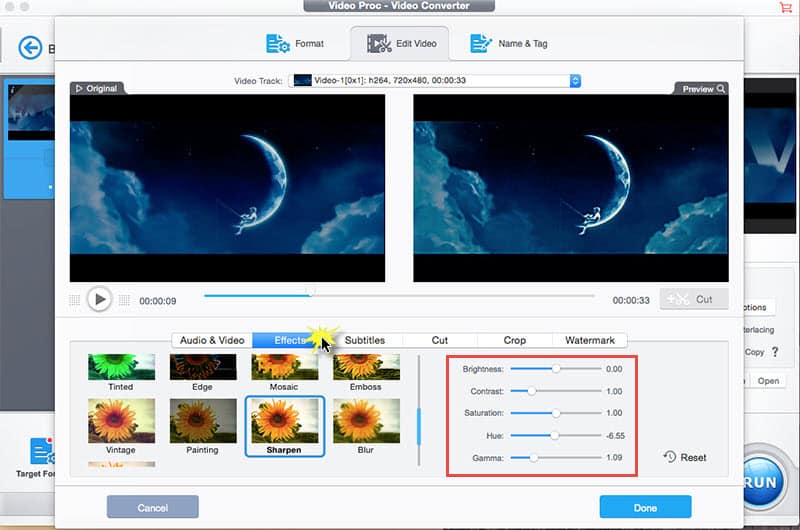
Step 3: Click "Effect" with a magic stick icon under the video info bar to enter into the video editing interface, where you can choose "Sharpen" to deblur your video or select "Tinted" to change video image color. There are more special effects available, for instance Grayscale, Negate, Mirror, Vignette, Painting, etc.
Step 4: Focus on the right side of the window, where you can enhance video quality by adjusting brightness, contrast, saturation, hue and gamma. Generally, this software will automatically adjust these video image parameters to the optimum value. You don't have to manually tweak them again if you're not familiar with them. Of course, this advice is just for newbies. As for experts, do as you wish.
Additional information: Gamma correction, or often simply gamma, is a nonlinear operation used to encode and decode luminance or tristimulus values in video or still image systems. To know more details, please visit wikipedia.
Step 5: Tap "Done" after you're satisfied with the revised quality through the preview window. Afterwards, give the last hit on "RUN" button to begin to deblur and upgrade video quality.
2. Toolbox
Note: the current version of VideoProc doesn't support you to simultaneously use video editing features and toolbox (at the bottom of the video home screen). Therefore, you need to load video files again after the previous process is finished. The similar steps are skipped and we go straight to the toolbox part.
Step 1: Shift your attention to the bottom of the interface and then tap "Toolbox".
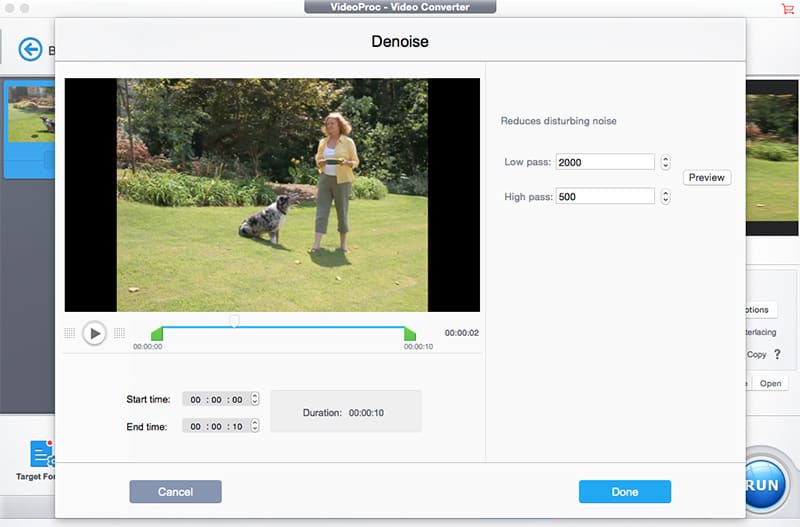
Step 2: Choose "Denoise" if you wanna remove grain and background noise from video to enhance video quality. Alternatively, tap "Stab" to stabilize your shaky video. Or click "FishEye" to correct your fisheye lens distortion video.
More options are designed for you: merge, split, video to GIF, video to M3U8, 3D video to 2D video, export subtitles from video, etc. Yet, keep in mind that only one option is supported at a time. For example, you need to finish video denoise first and then load video again for fisheye correction. One option, one time.
Step 3: Press "RUN" button and this video quality enhancer goes into action to help you fix fisheye distortion, remove background noise or stablize shaky video.
Note: the built-in "Denoise" feature now can only allow you to remove low-level grain from video. That's to say, its current grain removal feature is not strong enough. As for the severe grain in video image, its funtion is limited and it's hard to significantly upscale video quality.
Must-know tip: How to correct fisheye effect >>
3. Parameter Settings
The most common way to enhance video quality is to adjust video parameter settings, including resolution, bit rate and frame rate. And this solution can be accomplished during video editing, toolbox or video conversion process, needless to separately do these.
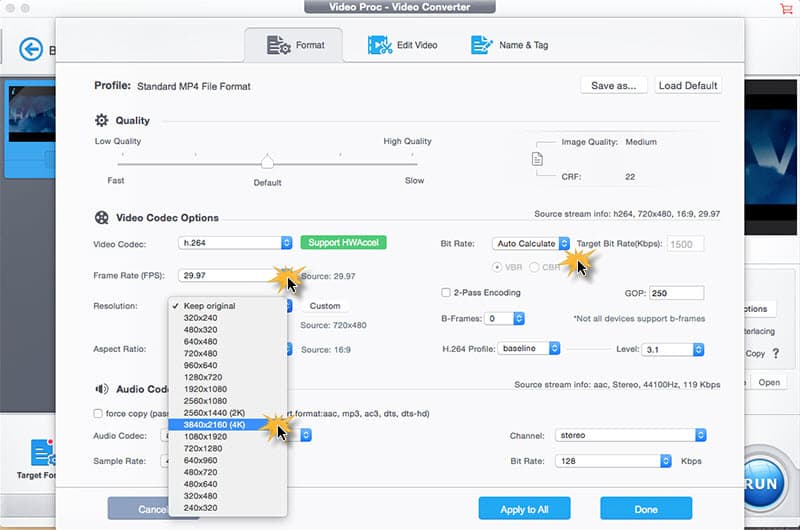
Tap codec icon  at the video info bar and the parameter settings window will pop up. Unfold resolution option to increase video resolution from 480p/720p to 1080p/2K/4K 2160p or even 8K 4320p. As for Frame Rate, feel free to turn up frame rate from 29.97FPS to 30/50/59.94/60FPS to improve video smoothness. Bit rate can be manually increased once you change "Auto Calculate" to "Manual". Generally, you're suggested to upscale bit rate around 40% higher, which would be the optimum value. It's meaningless to unboundedly increase video bit rate.
For experienced users, the advanced settings like 2-Pass Encoding, GOP and B-Frames can be customized if necessary. They are helpful for you to futher improve video quality yet at the cost of a little bit slower speed.
Warm Prompt: On top of enhacing video quality, if you also need to transcode and compress video for uploading to YouTube, Facebook, Instagram, Vimeo, etc. SNS platforms, this video quality enhancer also works like a charm for you. With 420+ output formats and mobile device profiles supported, you can convert low quality video to high quality with HEVC, H264, MP4, MOV, MKV, VP9, AVI, FLV, etc. various codecs and formats. In general, to upload video to SNS websites, H264 is highly recommended, with an excellenct balance between video compatibility and high quality. As for playback video on latest iPhone iPad Android devices, probably HEVC is your best option, roughly 50% smaller in size while keeping the same level of high quality.
Video quality enhancement isn't accessible to every video. For those videos with very blurry image or rather bad quality, the possibility to enhance video quality narrows down to zero. Cuz generally, the duty of a video quality improver software is to make video quality better, instead of turning very bad quality to a good one. Honestly, the capability of any tool is constrained, not omnipotent.