Is there no iTunes error code showing up on the pop-up notice of "iTunes could not backup the iPhone"? Have no idea on how to tackle this iTunes error? No biggie! This post is what you need, with all the resultful solutions covered for you to make iPhone backup successfully completed with iTunes.
 By Abby Poole to iTunes Troubleshooting Tips|Last updated on Jan 8, 2024
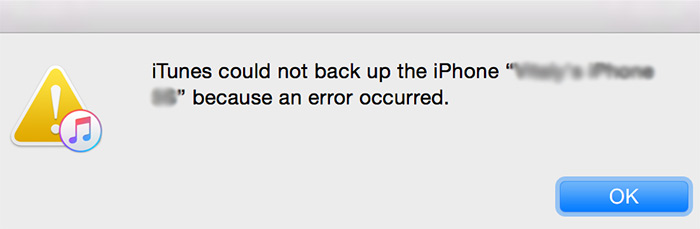
You desperately need a tech savvy to lend you a hand when you encounter with "iTunes could not backup the iPhone [xxx] because an error occurred" problem. You post your problem on the forum or other social network sites and wait for the insiders or experts to offer you some effective solutions. However, most of time, you have no luck to get the instant replies from the professional netizens, or you need to wait one, two or even ten days for a workable solution. That's definitely a mental torture. If you're eager to solve this iTunes backup error as soon as possible, you come to the right place, where you can find the complete solutions to fix this iPhone could not be backed up by iTunes error.

Firstly, check if your iTunes version is the latest version. Click Help > Check for Updates > choose "Download iTunes" if there is a new version available. After the new version installation is finished, relaunch iTunes and connect iPhone to try again. Besides iTunes couldn't backup error, this also solves iTunes won't sync problem and iTunes not restoring issue caused by iTunes 3004, 3194, 14, 9, 9006 etc.
Unplug your iPhone, quit iTunes and shut down your computer. Afterwards, restart your desktop to have a try. It fixes iTunes could not backup iPhone error owing to disconnection.
Some, if not all, suggest you to delete the previous iTunes backup, for they use this way to successfully solve this iPhone backup error in iTunes. Yet, prior to deleting the iTunes backup, if you want to keep a copy of this iPhone backup as Plan B, you can move the backup files to other places first. The iPhone files storage place is located at:
For macOS, go and find /Users/[User Name]/Resource Library/Application Support/MobileSync/Backup/.
For Windows 10/8/7/Vista, head to /Users/[User Name]/AppData/Roaming/Apple Computer/MobileSync/Backup/.
For Windows XP, navigate to /Documents and Settings/[User Name]/Application Data/Apple Computer/MobileSync/Backup/.
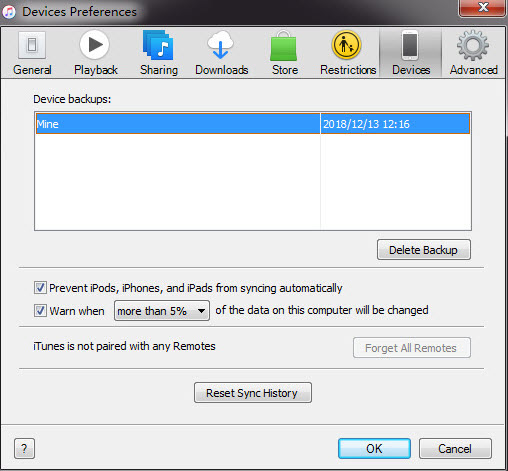
When you're ready, access to iTunes > click "Edit" from the top menu > tap "Preferences" > choose "Devices" > select your iPhone under "Device backups" > tap "Delete Backup" > click "OK" and it will delete the last iPhone backup from iTunes. Afterwards, you can create new iPhone backup.
Most of time, the iTunes error of iPhone backup is caused by the security software or the improper settings of firewall. What's worse, even though you close and quit the security software on your desktop, it might still interfere with your iTunes backup. And in case the latest version of the security software is incompatible with the latest version of iTunes, you might have no choice but to uninstall your security software for a moment. After the iPhone backup is finished by iTunes, reinstall it on your Mac/PC.
Also See: iTunes Backup Couldn't Be Completed Error Solved >>
It doesn't happen quite often, but it does exist. Providing you use two Apple IDs to backup iPhone file data, you need to cancel one ID first. Now tick the Sync option, undo the Sync on all the applications and then choose the application. That would delete all the applications that are synced by the other Apple ID. Lastly, tick the local applications and choose to sync.
Each time you need to sync iPhone files, access to private/var/mobile/Media and delete iTunes_Control folder. Now re-open iTunes and you can begin to smoothly sync and backup iPhone files. One thing worthy of note is that the music songs and applications would be required to backup, for they might be erased.
There stands a high chance that your Disc C is full. If so, you're required to save iTunes library and iTunes media to another disc. The specific steps are below:
Step 1: Close iTunes. Go back to the computer desktop and open "My Documents" & "My Music" folders.
Step 2: Cut and move the iTunes folder to the place that you want to save, such as Disc D or Disc E.
Step 3: Go back to the computer desktop, press "Shift" key, target on iTunes icon and right-click to choose "Open". Note: press "Shift" key until the dialog box pops up to let you choose iTunes library.
Step 4: Tap "Select database" and find [itunes Library.itl] under the new disc. Click "Open".
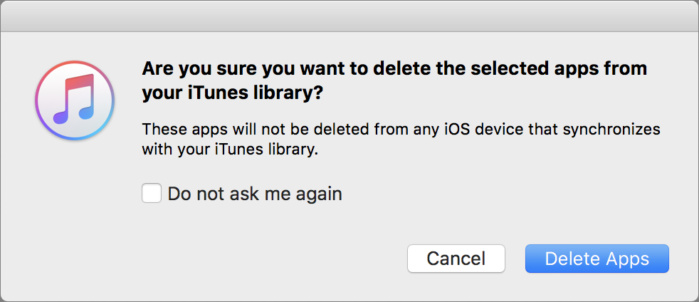
Step 5: Tap "Applications" at the upper left corner in the iTunes > press on Ctrl+A to select all the applications > right click to choose "Delete" > choose "Delete Apps" at the pop-up dialog box > opt for "keep Files" at the next dialog box.
Step 6: Select all the applications under [Mobile Applications] folder and move them to iTunes. When the processing task is finished, you can find the iPhone files are successfully moved to the iTunes default download folder.
Resetting lockdown folder can solve the problem of iPhone backup. If you can make an iPhone backup in iTunes using the new user account, please don't reset lockdown folder. If not, give the following method a whirl:
For macOS users:
Step 1: Disconnect all your iOS devices from your computer and quit iTunes.
Step 2: Open "Finder" > choose "Documents" > etype "/var/db/lockdown" > hit "Return" key. And there will be one or more folders with long alphanumeric names shown at Finder window.
Step 3: Click "Edit" > choose "Select All" in Finder > select files and move to trash. Enter the administrator's password if needed.
Note: keep in mind that the Lockdown folder itself should be kept. What you delete is the files, not the folder.
Step 4: Re-connect your iPhone to computer and fire up iTunes again.
For Windows users:
Step 1: Disconnect iPhone from your computer and quit iTunes.
Step 2: Open "Computer" from the start menu > enable "Organization" from the top menu > click "Folder and Search Options" > choose "View" tag > change "Hide files and folders" into "Display hidden files and folders".
Step 3: Navigate to the folder: C:\ProgramData\Apple > move Lockdown folder to trash > re-connect iPhone to PC and open iTunes.
USB cables might disturb the files sync and backup between iPhone and computer. Please follow the below tips to get around this:
1). Disconnect all the other USB cables, including priner, scanner, card reader, etc. Just keep the keyboard and mouse connected.
2). Connect your iPhone to computer via USB 2.0 port, instead of the USB port at the front of your PC.
3). Re-launch your computer and activate iTunes to backup iPhone content.
iTunes shouldn't be the only one to blame for this iTunes error. Sometimes, your iPhone might be the prime culprit. If so, use one of the below methods to get it solved.
1). Camera Rolls: when it comes to backup iPhone photos, it will lengthen your backup time and cause the backup failure if there is something wrong with one of the pictures. To fix this, import all the items of camera rolls or saved pictures, delete them from devices and make a backup again.
2). Data from Applications: some file data in applications might pose negative impact on iPhone backup. If so, erase the data from applications or directly delete the insignificant apps. Then try to backup iPhone to iTunes.
Create a new user account and try to use it to log in and backup iPhone file data. Afterwards, log out your current account and register with the new user account > open iTunes > connect your iPhone to your desktop via USB cable to try again. Assuming that you have idea about how to create a new user, do as follows:
Here we take MacBook for instance. Select "Preferences" under Apple menu > tap View and choose Account > click "+" plus icon and enter a name & short name for the new account > enter the password > tick "Allow users to manage the computer" > choose "create account" and that's it! It would be much easier for Windows to create new user account. So we just skip this part. You can google it if you're a noob.
Ditch away iTunes and resort to its sibling - iCloud to backup iPhone without iTunes.
1). Connect your iPhone to a Wi-Fi network.
2). Head to Settings on your iPhone > tap your name > click iCloud.
3). Toggle iCloud Backup to green status.
4). Tap Back Up Now. Stay connected to your Wi-Fi network until the whole process accomplishes.
If you still have no luck after trying the above solutions, you can take best iTunes alternative - MacX MediaTrans into consideration.


Digiarty Software, Inc. (MacXDVD) is a leader in delivering stable multimedia software applications for worldwide users since its establishment in 2006.
Home | About | Site Map | Privacy Policy | Terms and Conditions | License Agreement | Resource | News | Contact Us
Copyright © 2026 Digiarty Software, Inc (MacXDVD). All rights reserved
Apple, the Apple logo, Mac, iPhone, iPad, iPod and iTunes are trademarks of Apple Inc, registered in the U.S. and other countries.
Digiarty Software is not developed by or affiliated with Apple Inc.