By Rico Rodriguez to iPhone Management | Last Updated on Dec 18, 2023
 How could I transfer photos from Mac to iPhone? It's better that photos were stored on my iPhone so that I can watch them at any time through the Photos app on the iPhone. Is there any way or available app to easily move photos from Mac to iPhone?
Frankly, there are many different purposes for people to copy photos from Mac to iPhone, for example, offline enjoyment, creating HD wallpapers for iPhone, sharing photos with friends anytime anywhere, storing 4K/HD photos taken by digital camera on iPhone, backuping memorable photos on iPhone, etc. Undoubtedly, the most important thing you should figure out is how to add your photos to iPhone, or briefy transfer photos from Mac to iPhone no matter what kind of purpose you have.
To easily get your Mac photos on iPhone, some people would like to take advantage of iTunes, iCloud and similar apps, while others prefer professional third-party iOS photo transfer like MacX MediaTrans. Actually, each of those utilities has their own outstanding capability. Here, we'd like to show you how to transfer photos from Mac to iPhone effortlessly via these tools.

Nothing Gets Easier Than MacX MediaTrans!
• Transfer photos from Mac to iPhone in batch with original quality reserved.
• Backup iPhone photos (heic/jpg) to iMac/MacBook and restore them easily.
• Auto convert iPhone HEIC photos to JPG format with better compatibility on Windows/PCs.


Serving as a powerful iPhone photos transfer software, MacX MediaTrans can painlessly sync photos to iPhone 8 in batch. It will never erase data on Mac like iTunes after syncing to iPhone. Besides, you are also allowed to transfer photos from iPhone to Mac computer for freeing up more storage space, and convert iPhone HEIC photos to JPG for better compatibility on Windows and older MacOS. Meanwhile, all your photos will be sorted organically by date so that you can manage and delete iPhone photos in bulk easily. BTW, the iPhone photos transferring will be accomplished quite fast, up to 8 seconds for 100 4K photos.
Before everything, you should download this iPhone photo transfer on your Mac computer. It's available on Mac OS X 10.6 and above. Now, follow the below step-by-step guide.
Step 1: Connect Your iPhone to Mac Computer
Fire up MacX MediaTrans and connect your iPhone to Mac computer with a USB cable.
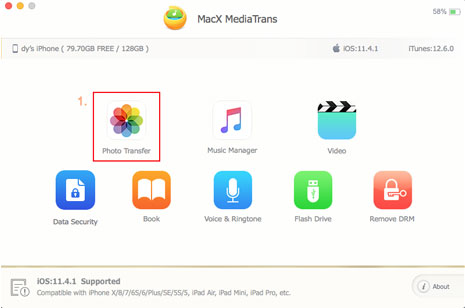
Step 2: Get An Access to Your iPhone Photos on Mac
Hit "Photo Transfer" button on the main interface to get an access of your iPhone photos which is displayed organically by categories of Camera roll, Selfies, Panoramas, Screenshots and so on.
Step 3: Import Photos from Mac to iPhone
Create an new photo album by clicking the "+" button on the left column. Click "Add Photo" button to select photos on your Mac hard drive that you want to sync to iPhone. Then click "Open".
The new added photos will be marked with a New tag, and you're also available to delete the importing by clicking the red cancel button separately.
Step 4: Sync the New Added Photos to iPhone
Press "Sync" button to sync photo from Mac to iPhone. Certainly, in this panel, you also can copy photos from iPhone to Mac with ease. Note: the supported input photo formats contain PNG, JPG, JPEG and BMP.

1. This iPhone transfer also provides users two-way to sync music, video, ringtone and ebooks between computer and iPhone/iPad/iPod. That is to say, copying video from iPhone to Mac, downloading songs from iPod to Mac, or even importing ebooks from Mac to iPad is a piece of cake.
2. Better yet, MacX MediaTrans is able to freely mount iPhone/iPad/iPod as a USB flash drive to store a number of data files like videos, music, movies, installation packages and more.
It is pretty simple to use iTunes to copy photos from Mac to iPhone. This way is totally free, but the only drawback is that perhaps you will lose your previous Photo Library on your iPhone in the process of transferring. Comparatively speaking, iTunes is less safe than other photo management software. Now, we take a look at how to use iTunes to move photos from Mac to iPhone.
Step 1: Open up iPhoto and add photos to iPhoto library. Alternatively, you can create a folder with photos on your Mac.
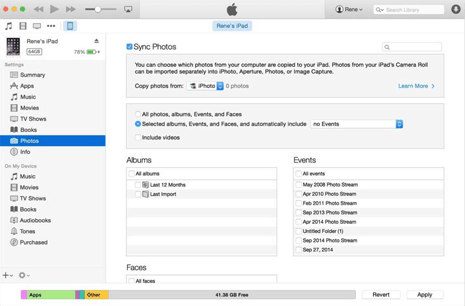
Step 2: Connect your iPhone to Mac via a USB cable and launch iTunes. Then tap the "Device" button and click on "Photos" tab in the right panel.
Step 3: Click the checkbox next to Sync Photos and select iPhoto or Choose folder.
Step 4: Tap the Apply button in bottom right corner to start to sync photos from Mac to iPhone.
Note:: To use iPhoto to trasnfer photos for iPhone, you need to make sure your Mac operating system is Macverick or older. Or, iPhoto is not working on your Yosemite or newer operating system.
Most of people may feel confused about how to import photos from Mac to iPhone without iTunes. In fact, in addition to iPhone file manager, you can apply iCloud storage service to achieve the goal. To be specific, iCloud allows users to transfer HD photos, downloaded iPhone wallpapers from computer to cloud storage so that they can view those pictures at anytime via iDevices. But, there are only 5GB of free storage space, so you must pay some money to buy extra storage space. What's more, iCloud uploader only supports uploading the JPG formatted photo files. Ok, let's begin to import photos from Mac to iPhone with iCloud.
Step 1: Check your iCloud Photo Library whether or not it is enabled on iPhone.
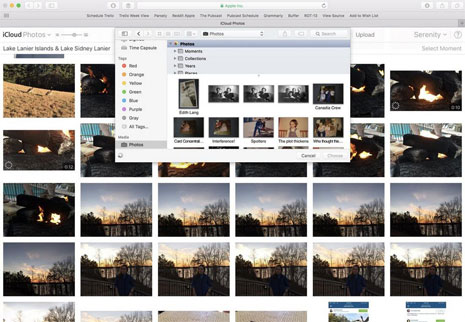
Step 2: Log in iCloud.com and hit the "Photos" icon on the main page.
Step 3: Tap the "Upload" button in the upper right corner to upload the photos on iCloud library that you desire to transfer to iPhone.
Step 4: Select the photos on Mac for adding to iCloud library.
Step 5: Enable iCloud Photo Library on your iPhone and the pictures on iCloud library can be accessed from there.
Note: This way can only sync the photos on Camera Roll, while the photos in the Photos library will be deleted.

This top-most iPhone photo manager enables users to super fast copy and move photos from Mac to iPhone and sync music/video/ebooks/ringtones from Mac to iPhone in batch, as well.
Learn iPhone 8 tips tricks, reviews, pros to make best of iPhone 8.
Follow this tip to put iPhone video to Mac to free up storage
Guide you to export photos from iPhone to Mac and vice versa
For any questions with MacX MediaTrans, please feel free to contact our support team.

Home | About | Site Map | Privacy Policy | Terms and Conditions | License Agreement | Resource | News | Contact Us
Copyright © 2026 Digiarty Software, Inc (MacXDVD). All rights reserved
Apple, the Apple logo, Mac, iPhone, iPad, iPod and iTunes are trademarks of Apple Inc, registered in the U.S. and other countries.
Digiarty Software is not developed by or affiliated with Apple Inc.
 MacX MediaTrans - Transfer photos from Mac to iPhone Easily