[Mac Photos Tutorial] How to Use Photos on Mac

By Rico Rodriguez to Photos on Mac, Apple Resources| Last Updated on Sep 21, 2023

Photos, as the alternative to iPhoto, brings you a more intuitive interface, better organization system and faster speed. These are the main reasons why so many iPhoto users choose updating to Photos. Yet, after you update the iPhoto app, you will find there are big differences between iPhoto and Photos. The way you once used on iPhoto to organize and edit photos is not working on Photos. You could figure it out by yourself if you are a tech savvy. You might get nothing but lose your patience and time if you are only a hobbyist. In such case, the best way is to refer to a professional Mac Photos tutorial, with which you can learn the detailed guide on how to use Photos on Mac to organize, edit and share pictures. Below is everything you need to know.

Part 1: How to Import/Export Pictures on Photos for Mac

use Photos to import and export iPhone images

To import iPhone pictures to Photos on macOS, follow the steps below:
1. Launch Photos app on macOS and connect your iPhone to MacBook, iMac, etc. via USB cable.
2. Tap "Trust this Computer" on your iPhone when you receive a message.
3. Select photo items you wanna import to Photos for Mac. Or just choose "Import All New Items".
4. Pull your iPhone out of your Mac after the whole process is done.

Note: if this is the first time for you to connect iPhone to Mac Photos app, please don't undo "Open Photos for this device" option at the top menu. If you accidently undo this option, please disconnect your iPhone to Mac, shut down and reboot your iPhone. Then re-connect iPhone to Mac Photos app to import pictures again.

To export pictures from Photos app to Mac, do as following:
1. Choose the pictures you plan to export to macOS.
2. Click "File" on the top toolbar of your MacBook/iMac > Tap "Export" > Tick "Export XX Photos".
3. Select export image format (JPEG, TIFF, PNG), Info and File Naming > Click "Export" button.
4. Open "Finder" on MacBook, Mac Mini, iMac desktop to search and find the pictures you export.

Though Photos enables you to transfer photos from iPhone to Mac, it can't bulk transfer photos from Mac to iPhone. If you wanna bulk copy images to iPhone from MacBook, iMac or Mac Mini, MacX MediaTrans is one in a million, capable to help you add photos to iPhone iPad from Mac/Windows PC and do more stuff:

Secure Download
Secure Download

Part 2: How to Organize Pictures on Mac Photos App

When you launch Photos on Mac, you will be greeted with a neat yet intuitive interface, where only four buttons are listed out on the top banner: Photos, Shared, Albums and Projects. Here in this part, we will focus on how to use Photos on Mac (MacBook/iMac) to organize images into different albums, interesting projects and share with others via iCloud Photo Sharing. You can just skip this Mac Photos tutorial if you have such experience.

2-1: How to Create New Albums to Organize Pictures on Mac Photos App

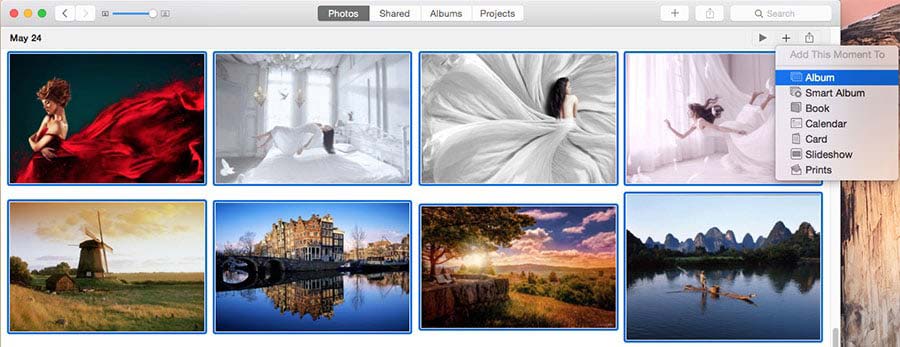
1. Choose the camera roll photos you wanna manage and organize into one album; or just select photos based on the same date or same place.
2. Click "+" icon on the right side of the pictures to choose "Album". You're also able to choose "Smart Album, Book, Calendar, Card, Slideshow or Print".
3. Name your new album on the pop-up window. Then tick "OK".
4. Click "Albums" button at the top menu of this photo organizing software and you will find the albums you create. If not, type album name on the search box.

Organize pictures on Mac Photos app

Note: the above tutorial also applies to other projects like Book, Calendar, Card or Slideshow, which will be stored in the "Projects" column. One thing you need to note is that most projects, except slideshow, charge you at different standard according to your choice like Book format (Square, Classic or Softcover), etc.

2-2: How to Enable iCloud Photo Sharing Using Photos for Mac

Before you go: upgrade Mac to latest macOS; make sure you set up iCloud on all of your devices and you're signed into iCloud on all of your devices with the same Apple ID. After everything is ready, let's get it started.

1. Click "Shared". If you once used this feature, the photos or videos you shared with others will be displayed here. If no, you need to enable it.
2. Click "Start Sharing" icon > press "Settings" option on the pop-up window > Sign in with your Apple ID and password > click "Sign in".
3. Choose "Allow" on your devices. Then enter the verification code sent to your devices on Photos for Mac. Remember your devices should be connected to the same network with your MacBook, iMac or Mac Mini, or it can't receive the message.
4. Hit "Next" to complete the rest steps based on the instructions it gives to you.
5. Opt for the pictures and people you wanna share. Afterwards, they can view the images you share to them and also make comments on your images.

Organize pictures on Mac Photos app

Note: on top of using iCloud Photo Sharing feature to share photos, you can also click share icon to share pictures via mail, message, AirDrop or third party extensions like FaceBook, Twitter, LinkedIn, Vimeo, Flickr, etc.

Part 3: How to Edit Pictures on Photos for Mac

Mac Photos app not only plays the role of a photo management software, but also performs a part as photo editor app. Assisted by this all-round Photos for macOS, you can easily add special effects on your images including Enhance, Rotate, Crop, Filters, Adjust, Retouch and Red-eye. The specific steps are below:

1. Select the photo you wanna edit.
2. Click "Image" on the top menu bar of your Mac screen > Tap "Show Edit Tools". Then the editing features in Photos will show up.
3. Use the 7 photo editing features to edit your pictures like enhance, rotate, crop, filters, remove red eyes, etc.
4. Hit "Done" button if you finish the image editing. Tap "Revert to Original" to undo the effect if you regret.

edit images on Photos for macOS

Note: Photos gives you the power to organize photos, videos and edit photos. Well, you may wonder can it edit videos on macOS? The answer is No. Currently, Mac Photos app doesn't have such ability to edit videos. There is likelihood that someday it has the capability to edit videos. But right now, you have no choice but to resort to Photos alternative like MacX Video Converter Pro to edit videos on macOS if you have this urgent need.

MacX Video Converter Pro is a professional video converter, video downloader, slideshow maker, as well as a video editor to help you compress and shrink video file with 20%-90% size off with no significant quality loss, crop video to remove unwanted video black borders, trim video to free adjust video Start/End time, rotate video 90/180/270 degrees, add SRT subtitles to video, add watermarks to video, change video aspect ratio 4:3 to 16:9 or vice versa, adjust video resolution 720p, 1080p, 4K 2160p, split video, merge videos into one, etc.

Secure Download
Secure Download

Part 4: Do More with Photos for Mac

There are also some bonus features Mac Photos app gives to you and they are indeed practical for you to further manage your photos on macOS. The following part will show you some (not all) features you might need.

4-1: How to Use Photos for Mac Faces to Organize Pictures

1. Navigate to "View" at the top menu bar of your macOS screen and click "Show Sidebar" option.
2. Click "Get Started" to activate this feature.
3. Double-click a face below and then type the name for the person > choose "Continue" > click "Done".

4-2: How to Add Info to Picture and Find Location Info

More than often, you will find most of your pictures are not named. They're just gathered by IMG_0627.JPG, like that. So this makes it hard to easily and fast find the picture you want, cuz the picture has no specific yet vivid name. This will become even worse when you get thousands of images in Photos. In such case, to add specific information to pictures become seemingly a significant thing, which can save you from endless finding and also give you more image info like location.

Add title to images on Photos

1. Choose a picture you wanna add name, description or keywords.
2. Right-click to open the hidden options, on which you tap "Get Info" option.
3. Type a title to the picture, add keywords or description and then press the "Enter" button on your keyboard.
4. Move your mouse to the blank area to double-click and then the picture location info will pop up to show you where you take it.
Note: beyond the "Get Info" feature, you can also choose "Duplicate" to copy, rotate photos clockwise, hide photos, delete photos and more.

Backup iPhone Photos to Mac and Add Photos to iPhone iPad

MacX MediaTrans is the best iPhone backup app that lets you to bulk transfer and backup photos, music, video, iTunes purchases, ringtones, iBooks from iPhone to Mac/PC and vice versa. Thus, you can update to iOS 17 on iPhone iPad without worrying about data loss.

Related Articles and Tips

How to Transfer Photos from iPhone to Mac

Guide you to export photos from iPhone to Mac and vice versa

Sync Music from iPhone to Mac 

Simple solution to transfer music from iPhone to Mac

How to Export Video from iPhone to Mac

Follow this tip to put iPhone video to Mac to free up storage

iPhone Transfer Software and Guide

Learn how to transfer data to/from iPhone without iTunes

For any questions with MacX MediaTrans, please feel free to contact our support team.

Home | About | Site Map | Privacy Policy | Terms and Conditions | License Agreement | Resource | News | Contact Us

Copyright © 2024 Digiarty Software, Inc (MacXDVD). All rights reserved

Apple, the Apple logo, Mac, iPhone, iPad, iPod and iTunes are trademarks of Apple Inc, registered in the U.S. and other countries.
Digiarty Software is not developed by or affiliated with Apple Inc.

Backup iPhone Photos to Mac & Add Mac Pictures to iPhone iPad