

"I just recently got a Macbook Pro, and kinda want to get into recording Minecraft. What would your guys' suggestions be for the best way to record?" – A Minecraft gamer
As the best-selling video game of all time, Minecraft has gained a strong fan base and gamers also get into recording Minecraft gameplay videos for keeping a highlight copy or uploading a tutorial. If you are one of Minecraft gamers, by recording Minecraft you can share your achievements in the game with your friends, show off your skills or make an experience video on YouTube or Twitch to earn money. Whatever, you need Minecraft screen recorder to help record Minecraft on Mac or Windows 10.
Best Minecraft Gameplay Recorder to Record 1440p/1080p/720p Videos
Hand-picked as the best Minecraft screen recorder for Mac, MacX Video Converter Pro gives great convenience to all Minecraft gamers to screen record Minecraft gameplays and tutorial videos on Mac for YouTube, Twitch, Facebook, etc. Ease of use and high in quality, it records Minecraft MOV videos at 30fps up to QuadHD (2560x1440) and webcam record you while gaming as well.
By 2023 there are expected to be almost 300 million frequent viewers of gameplay videos especially eSports streams worldwide according to statista.com, so watching videos of other people playing games is one of the biggest trends now. If you want to jump on board to stream your personal Minecraft gaming experience to get audiences on Twitch or YouTube, you need a Minecraft game recorder.
Out the market, list of gameplay recorders are prepared for you to screen record games besides Minecraft. With a brief classification, they are divided into three types including video player recorder, screen recorder with editing function and screen recorder with streaming ability. So, below will pick an example of each types to show you how to record Minecraft on Mac in full screen 1080p/720p at 30fps/60fps.
Method 1. How to Record Minecraft on Mac with QuickTime Player
• Record Minecraft gameplay in MOV (H.264) up to 2560x1440 at 30fps/60fps.
QuickTime is the default media player for Mac computers that comes with a built-in screen recorder. It lets you record the full screen or record part of the screen as you please.
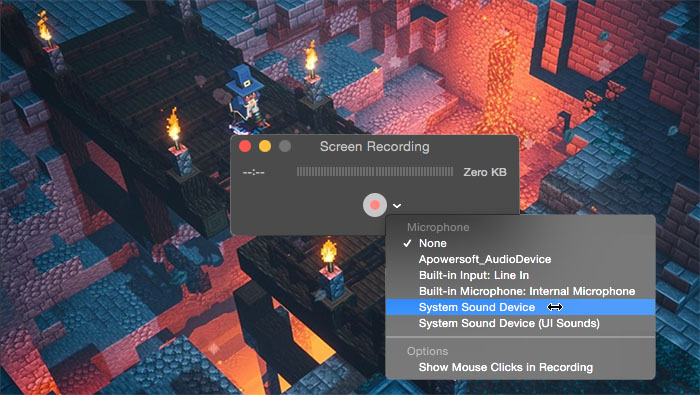
Step 1. Launch QuickTime Player on your Mac.
Step 2. Click on File on the menu bar on the left side of the screen, and select New Screen Recording from the drop-down menu.
Step 3. Click the caret next to the red record button to pick your audio options.
Step 4. Click on the red record button to begin recording the screen while playing Minecraft game.
Step 5. After recording the section you need, just click the Stop button in the Menu bar on the right side of your Mac screen.
Tips:
- To record the entire screen, just click anywhere on your screen and then click the prompt. To record a port of the screen, drag your cursor from one corner of the section to the other, and then click record when prompt.
- QuickTime player records Minecraft on Mac at 30fps by default, so it will look choppy when you are playing the fast-paced games. You can increase the QuickTime record frame rate to 60fps to solve the issue by clicking on Apple menu icon in the upper left corner of your Mac > select System Preferences > Display > Display tab > tick the Scaled option > select Larger Text > click OK.
QuickTime is the obvious and direct solution to screen record Minecraft videos on Mac, however, you can edit it with it. If you have such a need, try the following method.
Method 2. Screen Record Minecraft on Mac with MacX Video Converter Pro
• Record Minecraft gameplay in MOV (H.264) up to 2560x1440 at 30fps.
As the best third-party Mac screen recorder, MacX Video Converter Pro records your Minecraft gaming sessions and gamer moves in 720p/1080p/1440p at 30fps for a recap or uploading to Twitch, YouTube, Facebook, etc. as a tutorial. What you can record with this Minecraft recording software include Minecraft: Story Mode, Minecraft Dungeons, Minecraft Earth, and many other Sandbox, RTS, TPS, MOBA, RPG, etc. games.
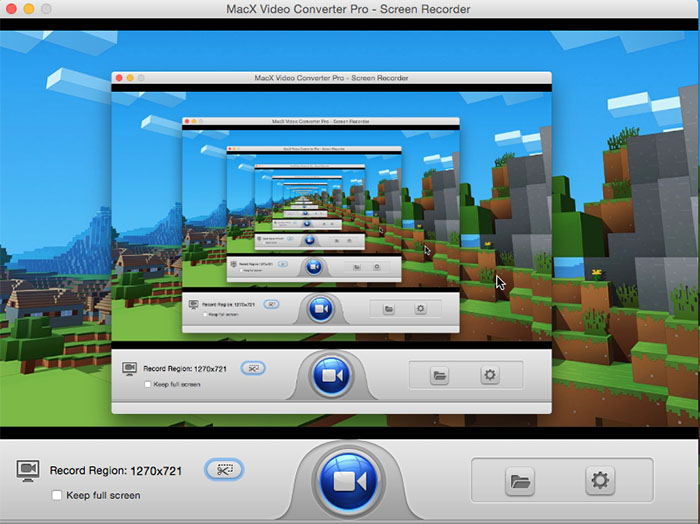
Step 1. Free download MacX Video Converter Pro, install and launch it on your Mac.
Step 2. Click on "Recorder" button to access the record window.
Step 3. On the record window, simply tap "Record Region" to customize the size of the screen you want to record, or just tick "Keep full screen" record Minecraft videos in 2560x1440p.
Step 4. Click on the blue record button to start recording. To stop the recording, simply click the Stop button in the Menu bar on the right side of your Mac screen.
Tips:
- If you want to record your responses while playing Minecraft game, you can click on the Camera button on the main UI.
- You can also have some simple editing to your Minecraft gameplay clips with this Mac screen recorder, like add subtitles, crop the black bar, trim the video length, set frame rate to 60fps, adjust video resolution and aspect ratio, etc.
Method 3. How to Record Minecraft Gameplay on Mac with OBS
• Record Minecraft gameplay in FLV/MP4/MOV/MKV/TS/M3U8 (H.264) up to 1920x1080 at 30fps/60fps.
OBS Studio is an open-source software that most gamers choose to capture real-time screen recordings and directly live stream gameplays to esports websites. If you have your own channel on Twitch, YouTube Gaming and Facebook Gaming, and often live share your gameplays, OBS is a good option to go.
Step 1. Go to OBS official site: https://obsproject.com/ to free download it on your Mac, install and launch it.
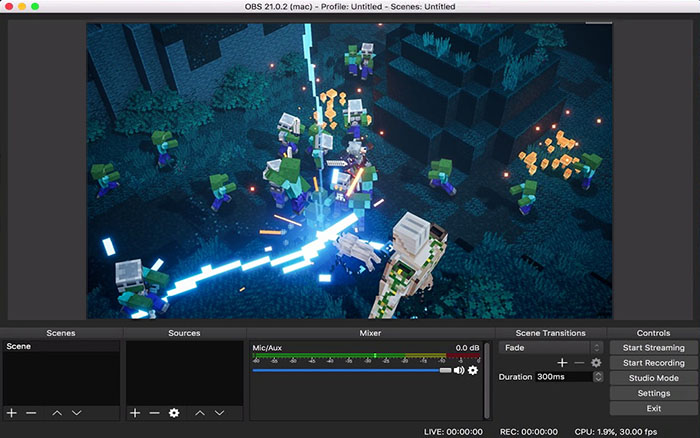
Step 2. Add one scene and name it under Scenes.
Step 3. Click on "+" button to choose Game Capture, name it and click OK.
Step 4. When the Properties window pops up, you can set the capture mode and some capture details. Then, click OK to save the settings.
Step 5. Click "Start Recording" button on the right lower corner to start recording your Minecraft game on Mac. Click "Stop Recording" in the same position to stop your recording.
Tips:
- To find your recordings, simply click on File on the top menu bar to choose "Show Recordings".
- You can directly live stream your Minecraft game recordings to Twitch, YouTube Gaming, or FaceBook Gaming by clicking on "Start Streaming" button on the right lower corner.
- OBS screen recorder is widely chosen by gamers but the setup is really complex to new users. Besides, as it’s open-source, there is no dedicated support team to help solve issues immediately. Besides, OBS won't capture game on Mac with Game Capture mode.
Frequently Asked Questions
1. What is the best Minecraft screen recorder for Mac?
What suits your needs most is the best. Minecraft screen recorders in the market have their advantages and disadvantages. After comparison, a few of them chosen by a large number of Mac users include QuickTime Player, MacX Video Converter Pro, OBS, DemoCreator, ScreenFlow, ScreenFlick and Camtasia Studio.
2. How do you record yourself playing Minecraft on a Mac?
To record yourself while playing Minecraft game, you need a webcam recorder to record you. And when recording Minecraft gameplay, you are suggested to turn on the cursor move option in your Minecraft screen recorder.
3. How to record Minecraft on Mac without lag?
The FPS of Minecraft game can reach 120, so the ideal FPS is 120 to capture a smooth game quality. However, most viewers’ computer configuration is not high, so recording Minecraft gameplays at standard 60FPS in 1080p is ideal to prevent lagging issues.
4. How to record Minecraft on Windows 10?
Without any third-party installation, you can directly record Minecraft game videos on Windows 10 with the help of the built-in screen recording tool named Xbox Game Bar. Also, you can record any actions on your Windows screen with it.
Step 1. Go to Settings on your Windows 10 computer.
Step 2. Turn on "Record game clips, screenshots and broadcast using Game bar".
Step 3. Launch your game and press "Win+Alt+G" keys. Then, check the box next to Yes, this is a game. Finally, press "Win + Alt + R" to begin/stop the game recording.


