

Want to cut down a shaky or useless part of your video recordings before YouTube uploading? Willing to trim out a funny part of a YouTube video? Or just split a long video into segments to reduce video size for YouTube? You could have relied on YouTube Video Editor to achieve trimming video on YouTube. But as of September 20, 2017, YouTube Video Editor is no longer available, then how can you edit YouTube video and trim YouTube video length? Actually, there are two ways: use YouTube Enhancement in Video Manager to trim out parts of your video, and turn to a free YouTube cutter.
Trim Video Through YouTube Video Manager
Though YouTube Video Editor is disabled since September, 2017, you can still edit video through YouTube site, but merely in Video Manager, where you can auto-fix lighting and color, apply slow motion, rotate the video view, apply fliters, trim out parts of your video and custom blurring etc. But here we're talking about YouTube video trimming.
a. Just log into your YouTube account and click Upload icon to upload video to YouTube.
b. Once your video is loaded, click on Video Manger icon before finally publishing the video to YouTube. By the way, you're able to edit your YouTube published videos in the Video Manager page as well.
c. Click on the Edit icon, then tap on the Enhancement button on the result page.
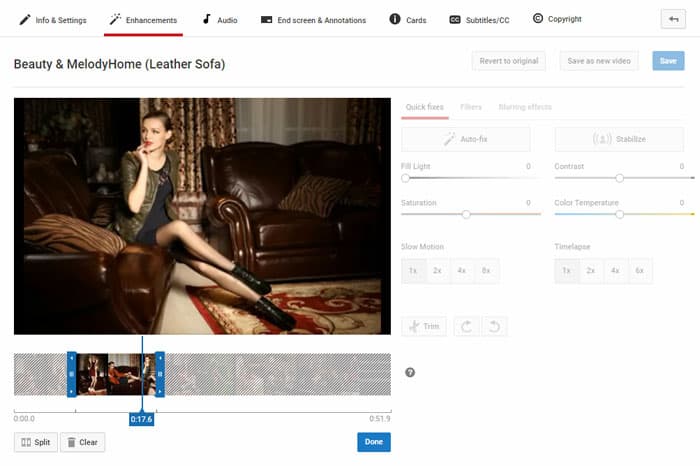
d. Here you'll see a Trim icon, click on it and move the start and end modules on the timeline to shear out the video parts. If you want to split video into clips, you can click on the Split button as you've moved the blue arrow line to the cut-off point. After you've done, click the Done button.
e. Click Save. If you want to create a new video with these enhancements, click Save as new video.
 The Limitations of Trimming YouTube Video for Free on YouTube
Yes, with above steps, you can cut YouTube video smoothly on Mac or Windows without installing any extensions or third-party software. However, Video Manager is not omnipotent and it has some limitations. Firstly, you cannot crop YouTube videos, merge several video clips into one, or some other further editing, which persuade you to turn to a professional yet free video editor for Mac and Windows. You can only edit and trim your uploaded video which hasn't received over 100,000 views. If you choose to upload your video to YouTube before trimming, it will cost you a lot of time and consume too much bandwidth, especially for 4K UHD higher resolution and large size videos. Worth yet, trimming video free with YouTube site gets more zigzag comparing to the previous intuitive editing page.
Alternative Way to Clip YouTube Video with Free Video Editor
To better trim YouTube video on Mac and Windows, you may need a free YouTube video trimmer, which is more reliable, flexible, and powerful than YouTube Video Manager. macXvideo should be your best choice, as it's an all-in-one video editor on Mac, not only enabling you to trim YouTube videos freely, but also transcode video to YouTube compatible formats and codecs, crop your YouTube video dimensions, split a long video into segments, merge video clips into one, rotate videos, add watermarks and subtitles. Better yet, this free video editor is accessible for 4K Ultra HD videos editing, that's to say, you'll never be troubled with 4K video upload fail on YouTube since the large video size. You can trim 4K video length at blazing fast speed to resize it, with the built-in hardware acceleration technology enabled.
>> Free Download macXvideo to Have A Try <<
[Tutorial] How to Trim YouTube for Free Easily and Effectively
Step 1: Free download the free YouTube video trimmer and launch it. Click on + Video button to import your video you're willing to upload to YouTube. Or you can drag and drop to load your target videos as well.
Step 2: Click on the scissors-shaped Cut button below the video information. Set the start and end time of your YouTube through dragging the ![]() knob, and click on
knob, and click on ![]() button and then tap the Done button to make your YouTube video trimming settings valid.
button and then tap the Done button to make your YouTube video trimming settings valid.
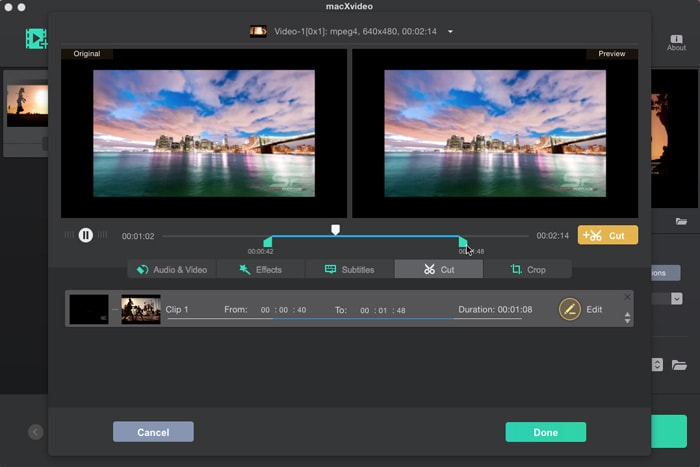
Step 3: At the bottom of the main interface, you can see all the common general-purpose formats are preset of your options. You're suggested to choose H.264 MP4 to make your video more compatible to YouTube site. If your video is already compatible with YouTube, you can skip this step.
Step 4: Tap RUN button to start cutting out YouTube video clip. Your video will be trimmed out in a twinkling, but it's closely related with your video length and computer configuration. Before you activate the trimming process, you can click on Folder button to change the output folder path on your Mac.


