[How To]Upload Photos to iCloud Photo Library from iPhone and Computer
Generally speaking, you'd like to upload photos to iCloud Photo Library from iPhone and computer mainly because you can access to these pictures on all your smart devices as long as you use the same Apple ID to log into iCloud account. That's quite convenient. Plus, after being uploaded to iCloud service, your photos can enjoy privacy protection. None, except you, can view your personal photos unless you admit and give him/her your Apple ID. That's also the reason why you send photos to iCloud service, instead of photo sharing sites like Instagram, Snapchat, Pinterest, Flickr, etc. social network sites.
Last but not least, ease of use is another significant reason for you to send pictures to iCloud. How easy is it? The below article will show you the simple steps to upload photos to iCloud Photo Library from iPhone 8/Plus/7/6s/SE/6/5s and computer, just like taking a candy from a baby.
Part 1 - How to Upload Photos to iCloud from iPhone 8/Plus/7/6s/SE/6/6 +/5s
In this part, you will learn how to move photos from iPhone to iCloud storage with two ways: the 1st general way is suitable for all the iOS 8+ iPhone users to upload photos; the 2nd way can only be used for iOS 17 iPhone 8/Plus/7/Plus/6s/Plus/SE users since iOS 17has new feature to enable "iCloud Photo Library".
That being said, before you begin, you'd better:
 Update iPhone to latest iOS 17 (much faster and easier). If your iPhone doesn't support iOS 17 Updates, you can update to iOS 17.3 or 10.2.
Check if your iCloud account has enough free space. There is only 5GB free space available. If iCloud storage is almost full, head to Settings on iPhone > click [your name] > iCloud > tap Photos > choose Optimize iPhone Storage. Alternatively, buy more iCloud storage 50GB, 200GB or 2T per month.
When the preparatory work is done, we can get a head start and begin with the general way to send photos from iPhone to iCloud.
1-1: How to Upload Pictures to iCloud from iOS 8+ iPhone
Step 1: Open "Settings" on your iOS 8+ iPhone.
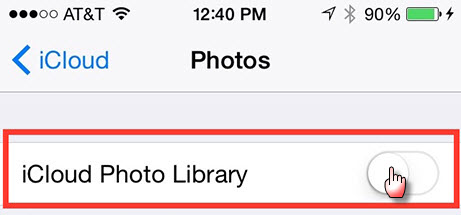
Step 2: Turn on "iCloud Photo Library" on iPhone.
In iOS 17.3 or later, click [your name] > iCloud > Photos > turn on iCloud Photo Library.
In iOS 17.2 or earlier, scroll down to tap iCloud > Photos > turn on iCloud Photo Library.
Then, your iPhone will automatically send your entire photo library to iCloud once your iPhone is connected to Wi-Fi and your battery is charged.
1-2: How to Upload Photos to iCloud from iOS 17 iPhone 8
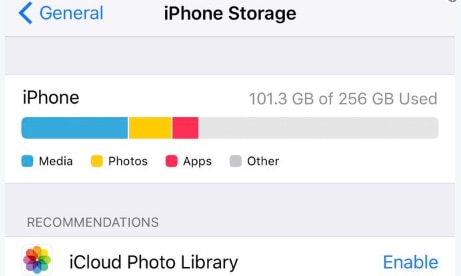
Step 1: Open "Settings" on your iOS 17 iPhone 8/Plus and more devices.
Step 2: Click "General" > tap "iPhone Storage" > enable "iCloud Photo Library" under recommendations.
Note: generally, you can upload iPhone photos to iCloud with 5 photo formats: JPEG, RAW, PNG, GIF and TIFF. Now iOS 17 supports HEIF new picture format, which can shot a picture with the same quality as JPEG but halve in file size. So if you take a picture with iOS 17 iPhone 8/Plus/7/6s, you can save them as HEIF format and upload HEIF to iCloud with 50% storage saved. (choose to save video to iOS 17 HEVC new format and then upload to iCloud).
Part 2 - How to Upload Photos to iCloud from Computer Mac/Windows
To move photos from computer to iCloud, here we choose iCloud.com to accomplish this task, for iCloud is much easier than the so-called iCloudSetup or something else on Windows. An easier way makes a faster ending. So who can say no?
Step 1: Open iCloud.com and sign in to your iCloud account with Apple ID.
Step 2: Click "Allow" on your iPhone after receiving a message of "Apple ID Sign in Requested".
Step 3: Enter the verification code (send to your iPhone) on the two-factor authentication page.
Step 4: Click "Photos" after successfully login. Afterwards, click "+" icon at the upper right corner to upload photos to iCloud from your computer.
The introduction of most widely used ways to upload photos to iCloud is completed. In general, the operating process is not complicated, easy to follow. No matter you are a new hand or an expert, you can easily get things done. Yet, the unexpected always waits around every corner. You might encounter some accidents like photos not uploading to iCloud, iCloud Photo Library "uploading" for over a week, iCloud stuck in sending photos, etc. Besides these problems, there are some other common problems during the process. Let's have a look and work together to solve them all.
Part 3 - Common Problems of Uploading Photos to iCloud[Solution Included]
1st Problem:
According to the online investigation initiated by ask.fm, iCloud user has about 37.4% chance to encounter iCloud backup couldn't be completed problem, iCloud stuck in uploading photos, syncing is slow, iCloud backup not working, etc. problem.
Solutions:
1. Close Wi-Fi and connect to a stable yet good Wi-Fi.
2. Turn off iCloud Photo Library. Delete or download photos that have already saved on other devices to reduce photo uploading burden. Then, enable iCloud Photo Library again to have a try.
3. Update your iPhone to latest iOS or update your macOS to latest operating system.
4. Shut down other apps running on your background.
5. Resort to Apple Support for help.
2nd Problem: iCloud only offers you with 5GB free space every month. Actually, it's far from sufficiency. When iCloud storage full notice pops up, you can try the following tips to free up space on iCloud.
Solutions:
1. Update to iOS 17 to shoot and save photos as HEIF format, which saves 50% storage on iPhone compared with JPEG format.
2. Choose "Optimize iPhone Storage" instead of "Download and Keep Originals" in iCloud settings.
3. Upgrade iCloud storage from free 5GB to 50GB, 200GB or 2TB per month based on your needs.
3rd Problem: One of iCloud features: any changes you make to your collection on one device, change on your other devices too. This means if you delete photos from iPhone 8, the photos will also be deleted on iCloud. They maintain synchronization. So if you wanna delete iPhone 8 photos but keep on other devices like Mac computer, try the below smart approach.
Solutions:
1. Download photos from iCloud to Mac/Windows computer if the quantity of your photos is not very large, for the downloading speed is an uncertain factor. More importantly, it would be troublesome if iCloud gets stuck or crashed.
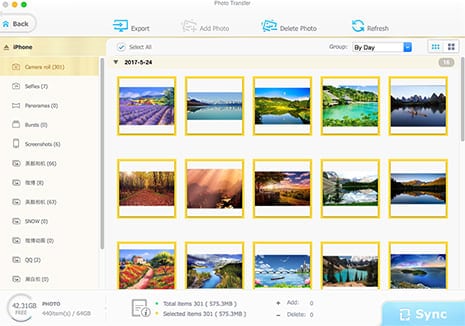
2. Seek help from an iPhone transfer tool like MacX MediaTrans to bulk backup iPhone photos to Mac/Windows computer (128/256/512GB/1TB) at full speed (no network needed) without iCloud storage full or iCloud uploading over 1 week errors.
Bulk backup photos from iPhone 8/Plus/7/6s/SE/6/5s/5c/4s to Mac/Windows (8s for 100 4K pics) for making a slideshow video or permanent storage.
Delete photos from iPhone iPad iPod in batch after the photo backup is finished. Thus, you can free up iPhone storage without losing your photos forever.
Self-contained iPhone manager to sync music, pictures, videos, iTunes purchases, ringtones, eBooks, etc. between iPhone iPad iPod and computer.
Remove DRM from iTunes M4V, M4P files and convert M4V to MP4, M4P to MP3 for playback on Android, VLC, smart TV, etc.

Secure Download

Secure Download


 By Rico Rodriguez to iPhone Tips , Apple Resources| Last Updated on Dec 7, 2023
 Photo
Photo Music
Music Video
Video iBook
iBook Ringtone
 Flash Drive