Encounter iTunes sync error when you're syncing music, photos, videos, movies, ringtone, apps and more between iPhone and iTunes? Here we collect the most annoying iPhone not syncing with iTunes failures and full solutions to fix them.
 By Abby Poole to iTunes Sync Troubleshooting|Last updated on Mar 11, 2023
Being the default iOS data sync and backup software, iTunes is usually a subconscious choice when Apple users intend to sync data. But once you actually sync iPhone to Mac/PC with iTunes, you may not have a good user experience owing to various dreaded iTunes error codes or endless popping up alert messages. For example, you may be notified that iPhone not connecting to your iTunes after you pluged in your USB cable to computer; your previous data on iPhone were erased after you sync iTunes library to iPhone; HEIC and HEVC files were skipped when syncing photos and videos with iTunes, iTunes won't sync any files that are not purchased from iTunes, or iTunes crashes unexpectedly.
Worse still, a great number of Apple users would like to use iTunes to get music and playlists synced between iPhone and iTunes library, but iTunes probably screwed everything up, getting a messy iTunes music library, too many songs duplicated, some songs grayed out, or unable to add new music and playlist to iPhone etc. Why iTunes have so many sync errors? How can you troubleshoot iTunes sync issues? Should you stay away from iTunes?
Make your own decision! Sync is to iTunes what dessert is to dinner, while MacX MediaTrans serves it as main meal. Dessert will never fill you up, but main meal will! That is to say, unlike sync works as an avocation on iTunes, MacX MediaTrans takes iPhone data sync as a main work, allowing you to sync kinds of files (photos, music, playlists, videos, audiobooks, podcasts etc.) in one click. No data loss and connecting issues, and no iTunes sync errors!
Moreover, iTunes sync error happens all the time owing to the same reason for different errors or different reasons for the same error. Rather than getting stuck in an endless loop of an iTunes sync error arising > solution searching > another error arising, turn problems over to an iTunes alternative - MacX MediaTrans, which absolutely helps you get rid of pesky iTunes error 54, library disappearing, unexpected crashing, or any other iTunes sync failures. Better yet, it's limited-time free now, first come, first served!


On the other hand, fixing iTunes sync errors is not that hard. Here we list all the annoying iPhone not syncing with iTunes errors you'll meet and solutions, not only including the iTunes songs not going to Music app on iPhone, but also sync errors related to photos, videos, movies, apps, ringtone, podcast etc. and the most common failures when syncing iPhone with iTunes.
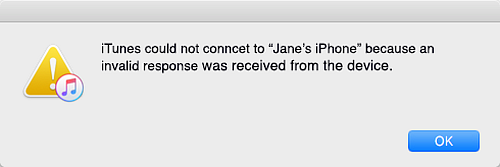
The connecting issue comes the first error that you may meet when syncing iPhone to Mac. Usually, when it happens, you can see an error message like "iPhone is disable, connect to iTunes", iTunes error 0xE000015, "iTunes could not connect to this iPhone because..." etc. And the cause of errors can be various, such as "an invalid response", "value is missing", an unknown error occured etc. But ultimately, it usually occurs when USB is not connected correctly, the USB port is damaged, or other connected USB devices make the normal communication between iPhone and iTunes inavailable.
Troubleshooting:
1. Try a different USB/lightning cable, or try a different USB port.
2. Close iTunes, reopen it and try again. And even reinstall the latest version of iTunes.
3. Restart your computer, iOS device and the router.
4. Make sure your iPhone is unlocked when it is connected.
Have you ever met a situation that you pluged in your iPhone to computer with USB cable and found it's charging but not recognized by iTunes, or iTunes does appears in iTunes, but the device option is grayed out? This is because your iPhone is not recognized or detected by iTunes. And when searching for fixes about this issue, I found it's usually resulted by iOS, macOS and iTunes update besides USB issue. So apart from the above troubleshootings, you can try the fixes below.
1. Check that you have the latest software on your Mac or Windows PC. If the problem persists, reinstall the software.
2. Make sure you have the latest version of iTunes on your computer. If the issue isn't solved, reinstall iTunes and try again.
3. If you see a "Trust this Computer" alert, unlock your device and tap "Trust".
iTunes Wi-Fi sync is a great feature that allows you to backup and transfer iOS files to your computer over Wi-Fi, rather than plugging in the USB lightning cable. However, in some cases, you're informed that iTunes Wi-Fi sync stopped working with an error message "The settings were not saved for the iPhone because it could not be found" or simply you find that the iPhone icon is not displayed in iTunes. Then how can you fix this problem and start sync over Wi-Fi again. Try the tips below.
1. Check the Wi-Fi connection on both devices. They need to be connected to the same Wi-Fi network.
2. Restart Apple Mobile Device Service. Go "Application" > "Utilities" > "Activity Monitor", and quit AppleMobileDeviceHelper, restart iTunes.
3. Rebuild Trust. Maybe the trust established before is broken. You can connect iPhone to iTunes via USB cable to re-establish the trust. Under the "Summary", recheck the option "Sync with this iPhone over Wi-Fi" and apply this change. Tap "Allow" to trust this computer if prompted on your iPhone.
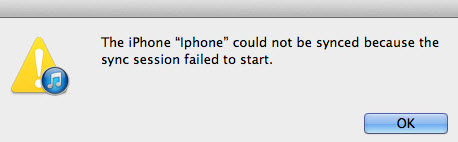
Occasionally, when you try to sync your iPhone iPad or iPod with iTunes, it may prompt you that "The iPhone could not be synced because the sync session failed to start". It's strange and in most cases it happens due to iTunes unknown errors. Recently, users reported that this issue happens a lot after iOS 17 update. But fortunately, we have some tips that could fix iTunes sync session failed to start problem after updating to iOS 17.
1. Force closing apps. Running apps can cause to stop the synchronization process and can be the reason to start sync session failed to start problems. So force closing apps can be best and easiest way you can try to fix iTunes sync session not staring/finishing error.
2. Update to the iTunes v12.9 (the latest version) since the iTunes error may be stemming from outdated iTunes and iTunes component software. You can launch iTunes and go to "Help" >"Check for Update".
3. Deleting old corrupted iTunes backups can stop this error message from popping up. Just choose "iTunes" > "Preference", click "Devices" and select the backup you want to delete, tap "Delete Backup" button, then "Confirm".
Also See: iTunes Sync Session Failed to Finish on iPhone iPad Solved >>
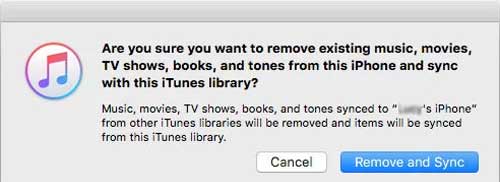
I bet most of you have encountered data loss while syncing iPhone with iTunes. By default, your iPhone is usually configured with iTunes on one specific computer to sync music and other files automatically. When you're willing to sync iPhone to a new Macbook, it will replace the contents on your iPhone with what is in this library on the new Macbook. There is a warning asking you to confirm that you want to erase and sync the device. You'll absolutely lose the previous data on your iPhone after iTunes syncing. But it doesn't mean that you cannot get rid of data loss when transferring iPhone data to a new computer.
1. Manage music and videos files manually so as to sync iPhone to a new Macbook without erasing. Connect iPhone to a new Macbook with USB cable, and click "Cancle" when there is a message that your iPhone has been synced with another computer. Then go to "Device" > "Summary", check the Manually manage music and videos box, and click "Apply". Now click the "Music" tab under "Library" to view songs stored in the iTunes library. Select your target songs and drag them to your iPhone's icon in the Devices list on the left side of the iTunes window.
2. Try a third-party app such as MacX MediaTrans, which ensures a smooth data sync between iPhone and new Mac without losing files.

Error 13014 happens a lot when you are opening iTunes, syncing iPhone iPad iPod with iTunes, or while other Apple-related program is running, after you downloaded a song, or even during Mac/Windows computer startup or shutdown. Also, it can be caused by a variety of factors, such as incomplete installation of iTunes, mistaken deletion of iTunes-realted files, virus or malware infection, corrupted iTunes files or damaged synstem files on Windows PCs. By the way, if you see iTunes error -5000, -69, -13010 when you sync music in iTunes, the solution goes the same with error -13014.
1. Make sure you have the latest version of iTunes and iOS.
2. Consolidate the media files in your iTunes library, as your files may be save in several locations. Check how to consolidate meida files >>
3. Change your third-party security software's setup.
4. If the error continues, try an iTunes alternative to fix iTunes error -13014.
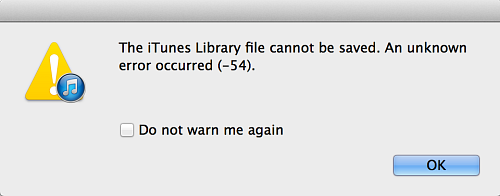
"The iPhone [device name] cannot be synced, An unkown error occured (-54)" is one of the most frustrating arising issues when you sync your iPhone to iTunes. iTunes Error 54 appears when a file on the computer or iPhone is locked or modified and inaccessible, or is a permission error either on your computer or the iOS device. It also happens when there's no newest iTunes version. For Windows PC, it can be corrupted windows system files because of a possible virus infection or due to user error. Whatever the reasons, you can try the following tips to fix the unknown error 54.
1. Restart the computer and your iOS device then retries the sync process to see if it fixed the issue.
2. Update your iTunes/iOS device to the latest version.
3. Remove PDF contents from the syncing. When syncing your iOS device with iTunes and iBooks will be one of those contents, there might be instances that iTunes cannot read the PDF file formats which may trigger the iTunes Error 54 during the process.
4. Right click iTunes folder > Properties > Security option. Click Edit and check the Full Control option.
5. Try an iTunes alternative to transfer data between computer and iDevices without using iTunes.
iTunes Match is another one Apple subscription service, besides Apple Music. It lets you match or upload up to 100,000 tracks from your Mac's library (or libraries) to iCloud Music Library, where you can then stream or download such tracks without DRM to up to nine of your other devices. But there are complaints that new added music in iTunes music library failed to sync to iPhone even though iTunes Match is "ON" on both computer and iPhone. To be frank, a variety of reasons can lead to iTunes Match not updating, such as iTunes version is too old, trouble exist in the firewall, or you have installed other sync tools on iDevice etc. Even if you cannot find the cause, you can still take steps to fix it.
1. Update iCloud Music Library to make iTunes Match working. Open iTunes, go to " iTunes" > "Preference" > "General", mark the iCloud Music Library and press OK. Then on the toolbar, go to "File" > "Library" > "Update iCloud Music Library".
2. Make sure you have the latest version of iTunes. And sign out and sign in iTunes to see whether it works.
3. Turn off iCloud Music Library and turn it on to fix iTunes Match problem.
How do you build your iTunes Music Library? Purchasing music and album from iTunes Store, extracting music from CDs, or downloading songs from online sites? Anyway, it's inevitable that your iTunes Music Library includes some MP3 tracks and non-Apple Music songs. They play well on iTunes, but things are not going well when it comes to sync such songs to iPhone since iTunes won't sync any music that was not purchased from iTunes. But does this mean you cannot transfer MP3 or non Apple Music to iPhone? Not really. You'll be surprised with the following solution.

MacX MediaTrans works as a solid iTunes alternative to transfer any files, including MP3 or any non Apple Music songs like FLAC, WAV, OGG, WMA, DTS, etc. between iPhone and computer. When you're sync such iPhone unsupported audio tracks from computer to iPhone, this program will auto convert them to iPhone friendly formats for best compatibility. It's pretty easy and fast to sync all music tracks from Mac/PCs to iPhone.
Just plug in iPhone to computer > Click Music Manager > Add Music from Mac/PC > Sync. All done!


Besides purchasing music from Apple Music, many users prefer to add ripped CD to iTunes Music Library. It plays well on iTunes. The problem is that these CD ripped songs won't sync to my iPod. Actually, this iTunes sync error is mainly caused by settings issue. Thus, to solve this iTunes not syncing music error and make ripped CD showing up on iPhone, iPad, iPod, you need confirm the following settings:
1. On the summary tab of your iTunes sync settings you have checked "Sync only checked songs and videos".
2. In your music library you have checked all the songs you want to sync to your iDevice.
3. There are no exclamation points next to any of the songs you want to sync to your iDevice.
4. You have authorized your computer for all Apple IDs for purchased music you want to sync to your iPod (in Store>Authorize This Computer).
5. You have checked "Sync Music" on the Music tab of your iTunes sync settings.
Quick Fixes: Transfer CD Ripped Songs to iPhone for Easier Playback >>
It's frustrated that you have created a new playlist on your Apple Music on Mac, but it doesn't show up on your iPhone after you synced iTunes to iPhone. Or on the contrary, you discovered your Apple Music playlist disappeared on iTunes after you transfer it from iPhone to iTunes. But this happens frequently when transferring music via iTunes. If you have the misfortune to find your music playlists not appearing on iPhone or iTunes, you can get them back with following steps.
1. Make sure that you're signed in to iTunes with the Apple ID that you use for your Apple Music membership.
2. Click iTunes > "Check for updates..." to update to the latest version of iTunes.
3. Turn on iCloud Music Library. Click "iTunes" > "Preference" > "General", and check the box of "iCloud Music Library".
4. From the menu bar at the top of your computer screen, choose "File" > "Library" > "Update iCloud Music Library".
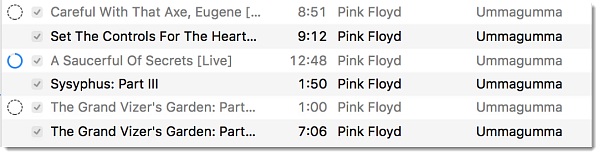
Turning on iCloud Music Library when syncing with iTunes allows you to sync whatever you put on one device with all your iPhones, iPads, Macs, etc. In theory, it's a great idea. But if you find some of your iTunes songs get duplicates. For example, every track that you had acquired elsewhere (CD Rip, purchased from another store, etc) was doubled in iTunes library. Or one version would have a little cloud icon with the down arrow, and the other would have a cloud and an X. Sometimes, you get one track with no icon (downloaded from iTunes) and the other with the X (your original file). Whatever the cases, your iTunes songs are duplicated, which will take twice as much as space on your hard drive and make you hear each songs twice in a row before advancing to the next one.
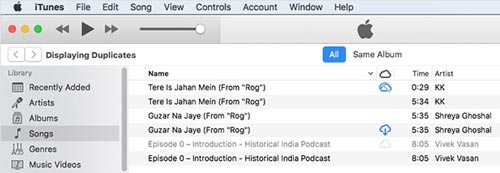
How to remove duplicate songs in iTunes:
1. Delete iTunes songs duplicates. Open iTunes > File > My Library > Show Duplicates, click on "All" to view the duplicate track listing, click "Same Album" to show duplicated songs from a specific album. Hold "Option" key and choose "Show Exact Duplicate Items" from the "File" > "Library" menu. Then select the duplcate copies, and click "Edit" >"Delete" to remove them.
2. Turn off iCloud Music Library. This does remove the duplicates, but it won't sync your new added songs.
Deleting music on iPhone can be easy. All you need to do is to open Music app, and find the song you want to delete, swipe to the left and click on the red delete button. However, there are users complain that they cannot delete music from iPhone with the above steps. After pressing the delete button, nothing changed except a icon of re-download icon on the song.
That's because the songs were synced with iTunes, which is unable to delete on iPhone. You have to back to the iTunes, deselect the song and resync to iPhone.
Have you ever experienced the despair that your whole iTunes library is gone? Yes, I have. And when I searched solutions from Google, I find I'm not alone. A great many users reported that they have the iTunes library missing error after they upgraded their iOS devices and iTunes version. While some lost their iTunes library because of the improper setting on iCloud Music Library. If you're in the situation, keep your shirts on, and try the troubleshooting tips below.
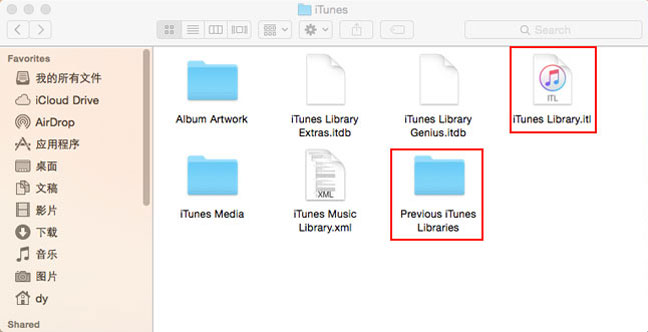
1. Restore iTunes library through the previous backup. Quit iTunes and go to iTunes folder, drag and drop iTunes Library.itl to Desktop, open the "Previous iTunes Libraries" folder and find the latest iTunes Library file, rename and copy it to the iTunes folder. Now open your iTunes, and you will find your missing iTunes library is back.
Missing artwork in iTunes and eventually iPhones and iPads has been a problem for years, especially after sync iDevices with iTunes. Though album artwork not syncing sounds like a minor error, it does cause inconvenience to users. Worse still, it seems that Apple is not going around to fixing it. Then how can you get back you lost artwork during syncing?
1. Use iTunes to replace each song's artwork. You can go about this in two ways. The first is to right-click the individual songs/album that missing artwork, then click "Get Album Artwork" in the menu. The other is to go to "File" > "Library" > "Get Album Artwork", which will get the album artwork for all of the songs that don’t have it in your library.
2. Manually add missing ablum artwork with third-party tools. By the way, each song needs to have all the proper metadata: album name, song title, artist, etc., Or else, iTunes won't find your artwork.
Owing to the limited space on iDevices or some other reasons, many users would like to sync the checked songs to iPhone iPad iPod only. But the problem is they find that the unchecked songs still syncing to their iDevices. What does it cause? And how can you get rid of iTunes keeps syncing unchecked songs. If you're precisely in this situation, you can go over the tricks to have a try.
1. Do you subscribe to iTunes Match and/or Apple Music? If so, be certain Settings > Music > Show Apple Music is "Off".
2. Enable "Sync only checked songs" under "Options".
3. Uncheck "Automatically fill free space with songs" option found on the Music sync settings. This option automatically selects music to fill the remaining space on your device.
Imagine this: You go to iTunes to play your favorite album or artist, only to discover that while your music is there, many of the tracks are grayed out! You cannot play, edit and even delete them. It's super frustrating. Actually, this iTunes error can be led by several reasons. For example, you're not connected to iCloud Music Library, the song isn't in Apple Music or isn't available in your current country, there are changes or edits to an album, or you have unsupported formats or DRM protected tracks. To solve iTunes songs grayed out issue, you can follow these quick tips.
1. Check for unsupported formats and DRM protection. If that's the case, convert music formats to iTunes, and subscribe Apple Music or iTunes Match for protected songs permission.
2. Delete the grayed out songs and redownload them from the purchased section in iTunes.
3. ReSync your iTunes Music to your iDevice if you find your songs are grayed out in iPhone iPad iPod.
4. De-authorize and then re-authorize iTunes on your computer, since iTunes may forgets that your music is authorized.
iTunes doesn't allow you to get iTunes Music on to non-Apple devices, since music purchased from iTunes Store is encrypted with DRM protections. Without authoration, you cannot play these DRM protected songs on other Apple devices, not to mention non-Apple devices. Even if you authorized to Apple devices or Windows PCs, you can play your iTunes music no more than 5 devices. And there are cases that users have gadgets other than Apple devices, and they want to play their purchased songs or albums from Apple Music on non-Apple devices. How could you do that?
1. Try MacX MediaTrans to remove iTunes Music DRM and convert Apple Music to MP3. Here is how to remove DRM from Apple Music >>
Several users reported that they cannot sync photos to iPhone and get an error message "iTunes cannot sync photos to the iPhone "[Device Name]" because your Photos library is not yet available. Please try again later." It might be a matter of Photos app, it's unavailable. If iTunes needs to write to the library during the sync process, it can't. Thus iTunes photos sync process fails. However, you can change the permission to make it available.
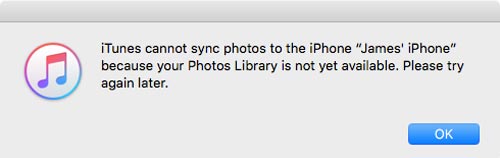
1. Navigate to the source of your Photos library. Open finder and locate it.
2. Right click on "Photos Library" and select "Get Info". At the bottom you will see a lock. Click it and enter your admin password. From the drop down lists at the bottom ensure "everyone" has the option to read and write to the file.
3. Get Info pane for the library folder. Here we can change the permissions.
You may also interested in: How to transfer photos from Mac to iPhone with ease >>
HEIC photos undoubtedly outputs a better image quality and smaller storage space. Thus iPhone users gradually record photos in .heic format since iOS 11. But it's a pity that some users find that some photos are not synchronized by itunes including HEIC photos. In the beginning, an error message "xx of those files could not be synced" popped up. But actually more photos than prompts weren't synced and some of them are HEIC photos. It cannot be denied that iOS and iTunes update could result in this iTunes photos sync problem as well, but HEIC still a big issue.
1. Ungrade iOS and iTunes to the latest version (If it already is, reinstall it to exclude the improper software installation).
2. Convert HEIC photos to JPG for better compatibility. MacX MediaTrans is a nice option. Check how to convert HEIC to JPG.
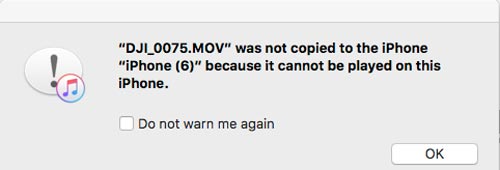
Watching movies through iPhone iPad on the go is increasingly a new trend. If you have some movies on your computer hard drive, transferring them to iPhone is a good idea to make them accessible anytime anywhere. However, when you syncing movies to iPhone with iTunes, an error message "[movie] was not copied to the iPhone [name] because it cannot be played on this iPhone" drives you crazy. The most probable cause is that the iPhone lacks codecs support in which movie file was encoded. Another possibility is that the resolution of the video is too high for your device to handle. Whatever the reason, the solution is to convert the movie to the appropriate format.
Troubleshooting:
1. Add the movie/video to iTunes library, make sure you have "Film" group selected before adding to iTunes Library.
2. Select it and go to the menu bar and select File > Convert and choose "Create iPod or iPhone Version", you video starts converting.
3. Delete the original one from the list. Then sync the converted one to iPhone.
Quick Fix: Convert Video to iPhone XR/XS/XS Max/X/8/7/6S etc.
Comparing to H.264, HEVC delivers 50% reduction of bit rate and the same high video quality. Thus, many users would like to encode a video file to HEVC/H.265 for playing on iPhone iPad. But the process didn't go that well since iTunes fails, saying that it can't transfer because the file is not compatible with my iDevice. Ultimately, it's a matter of format issue. Thus to solve this problem, you need convert HEVC videos to iPhone MP4 or MOV.
1. Create a iPhone version following the steps in #5.1
2. Try MacX MediaTrans to automatically convert HEVC videos to iPhone supported MP4, or MOV.
Have you ever in a situation that you have a MP4 video, but you cannot add it to iTunes. You choose "Add to library..." and select the file, but nothing happens. In this case, you can go to "Home Video" on iTunes to see whether it's added or not. If it's not added, it must be an issue of the MP4 video itself. Firstly, iTunes only allows MP4 video encoded with H.264, MPEG-4, HEVC, AAC codecs, but not including H.263, MPEG-2 etc. Then if you want to sync MP4 to iPhone via iTunes, the video need to meet the technical specifications of the iPhone like bitrate, size, sample rate and others.
Solutions to add MP4 to iTunes:
1. Convert the so-called MP4 to iTunes/iDevices supported MP4 format with iTunes (#5.1), Handbrake, VideoProc or the like.
2. Try an iTunes alternative like MacX MediaTrans to sync and automatically convert videos to iPhone.
iTunes crashing is really a headache. It just happens, and you don't even know the reasons. Unfortunately, a lot of people reported that iTunes crashes when syncing apps. iTunes starts to sync, but when getting to the point of "syncing apps to iPhone", it tries to add the first app - and crashes for good! How to fix it and get your Apps to iPhone?
1. Go to Apps in iTunes and delete those apps that are not compatible with your iOS. Then re-sync.
2. Update to latest iOS and iTunes, but then after the update DO NOT ALLOW itunes to sync apps! Go to iTunes folder on computer to empty Apps folder. Then go to iPhone to back it up to iCloud (Settings > iCloud > Backup). Click "Update all apps" on iPhone. Once it done, do another iCloud backup using iPhone, not iTunes. After that, plug your phone into iTunes and sync.
It's really depressed that ringtones have been removed from iTunes with 12.7. That means you cannot add and sync custom ringtones to iPhone. Thus, excepting purchasing ringtones from iTunes Store, you have no way to get iPhone ringtones after iTunes 12.7? No. You can still make custom ringtones for iPhone, add ringtones from computer's hard drive with MacX MediaTrans.

Step 1: Free download MacX MediaTrans (or Windows version for PCs) and launch it, then plug in iPhone to computer with USB cable. Click "Voice & Ringtone" to get an access to ringtone creation.
Step 2: Click "Add Ringtone" icon to import a new song from computer. Then click "Make Ringtone" icon next to the song, the popped-up window allows you to clip the song as a iPhone ringtone (no longer than 40 seconds). Click "OK" after you have done. (Or you can also go "Music Manager" > choose a music track > click "Make Ringtone" to make a ringtone.)
Step 3: Hit "Sync" button to transfer the ringtone you've create to iPhone XR/XS/XS Max, iPhone X/8/7/6S/6/5/4 etc.
Quick Fixes: Fix iTunes won't sync ringtones, Apps etc after iTunes 12.7 update >>
It appears Podcasts not syncing between iTunes and iOS problem is quite commom on Apple Community, but still lacking a solution. You just listen to podcasts in Podcasts app on iPhone, but those podcasts are not syncing from iPhone to your iTunes Library, when All applicable settings are selected on both Apple devices. There are some suggestions indeed for this failure, but sometimes it works, sonetimes it doesn't. Anyway, try it when there is no other way.
1. Choose Podcasts from the pop-up menu at the top left. If you don't see it, go to Edit Menu > Podcasts> Done.
2. Click Library > Select a podcast and click Refresh near the bottom left of the window. All currently available episodes of the podcasts you subscribe to are displayed.
3. This method works 100% of the time - using MacX MediaTrans to transfer podcasts from iPhone to computer, and add podcasts to iTunes Library.
The reason why iTunes has so many sync errors is not because it's not good enough. That's because data backup/sync is not the center of mass in iTunes. On the contrary, MacX MediaTrans concentrates on iPhone data sync and backup only, ensuring 100% safe and stable sync process.
Moreover, what we talked about above are the most common problems you may encounter with iTunes sync. With all these fixed, you'll experience a relatively smooth process on syncing iPhone photos, music, videos, podcasts, ringtones, apps etc. with iTunes. But if you want to get rid of iTunes sync error altogether, MacX MediaTrans is the best solution.

Digiarty Software, Inc. (MacXDVD) is a leader in delivering stable multimedia software applications for worldwide users since its establishment in 2006.
Home | About | Site Map | Privacy Policy | Terms and Conditions | License Agreement | Resource | News | Contact Us
Copyright © 2026 Digiarty Software, Inc (MacXDVD). All rights reserved
Apple, the Apple logo, Mac, iPhone, iPad, iPod and iTunes are trademarks of Apple Inc, registered in the U.S. and other countries.
Digiarty Software is not developed by or affiliated with Apple Inc.